In this weeks blog we are continuing with more flower drawings.
We are in the last week of The Wildlife Trusts #30dayswild, and we love celebrating the rich habitats and wildlife we have on our doorstep here at Heathlands.
To draw your 3D flower…
You will need:
Paper
A pencil
A pen
An eraser / rubber
How to draw a wildflower – cow parsley:
Using your pencil, begin by drawing an oval.
Draw a curved line under this as shown, to create a “bowl” or “goblet” shape.
Add a smaller bowl shape to the bottom of this.
Draw parallel lines down from the bottom bowl to create a stem for your flower.
Draw the flowers “sepals”. The part of the flower between the stem and the petals.
Draw your individual petals, following the curve of the bowl shape. Do the foreground petals first and add the background one after.
Add “stamens” growing out from the centre / inside of your flower.
Complete your drawing by going over your finished sketch with a fine liner. Allow this to dry for 5-10 minutes before rubbing out your pencil lines.
And you are done! You can add colour now if you wish.
For our final mini tutorial on how-to-draw flowers, we are looking at how we can change the perspective of our drawing, through simple changes in our drawing technique.
We hope you are all enjoying the #30dayswild activities that are being shared on the Heathlands Facebook Page and we would love to see any of the creative things you have been up to.
You will need:
Paper
A pencil
A rubber
A pen
How to draw a flower heads from different angles:
We are going to start by drawing our flowers first this time. Begin by drawing two (2) simple flowers with long petals like in picture one (1).
Next draw a third flower, this time draw the petals at the top and bottom a little shorter, and the petals on one side a lot shorter.
For our final two (2) flowers, draw the centre as “little domes” and only draw petals coming off the side or off the bottom. This way the are facing a different direction, sideways or upwards!
Finally connect your flowers with some stems and add foliage like we did in our first flower tutorial which you can find here: How to Draw… Flower #1
Welcome to our latest “hot-to-draw” mini tutorial! These instructions and video’s are all about improving our drawing skills and thinking differently about the simple things we can draw to make them even better.
This week sees the start of our #30dayswild activities with The Wildlife Trusts here at Heathlands, so drawing flowers seems very appropriate!
This is the second in our flower series and this time we are thinking about how to draw petals in an alternative way.
You will need:
Paper
A pencil
A rubber
A pen
How to draw a petalled flower:
Begin by drawing two (2) stems connected together like a long U shape, flaring out slightly at the top.
Pencil in two outwardly curvy triangles at the top of each stem.
Add a domed top to each triangle and make a smaller triangle at the bottom of each with a line. You can also add extra stems and flowers if you wish.
Draw long, curved, upside-down triangles to form the petals of your flower heads. The colour in the bottom triangle.
Complete your flower by adding long lobbed leaves and foliage!
Next in our mini-series of “how-to-draw” tutorials, is flowers!
Here at Heathlands we are blessed with an amazing 8 & 1/2 acres of woodland, pasture, gardens and wetland. We have a huge variety of wildflowers, we are cataloguing these on our Facebook here: Wildflower Post
It is also June, which means we have started our #30dayswild activities here at Heathlands. You can join in at home by going to The Wildlife Trusts website.
You will need:
Paper
A pencil or a pen
How to draw a wildflower – cow parsley:
Begin by drawing two (2) stems. One main stem and a secondary stem coming off the first.
Add six (6) curved stalks radiating out from the end of each stem. The centre two (2) stalks should be the longest and the outer two (2) the shortest.
Draw two (2) or three (3) foliage stalks coming off the main stems.
Add delicate feather-like foliage to the stalks from step three (3).
Complete your wildflower by adding little “stars” * to the tips of your flower stalks.
Step by step instructions for an interlacing wreath
We have bee concentrating on our drawing skills at Heathlands lately and this post is no different.
This time we are making things a little more complicated with a knotwork wreath, made of two interlocking or interlacing circles.
You will need:
Paper
A pencil
A pen
Something round or a compass
A ruler
How to draw a your knotwork wreath:
Begin by drawing a circle.
Make 12 evenly spaced point around your circle. Much like the points on a clock.
At each point, draw an arrow. Your arrows should all point in the same direction.
Inside each arrow create a little diamond.
From inside your arrowheads, draw curved lines to the previous arrow and finish them parallel to them. See images for help. Repeat all the way round.
From the open ends of your arrows, draw more curved lines, meeting up with the diamonds of the previous arrowheads. Again see images for help. Repeat until complete!
You can colour or decorate your wreath as you wish. I have yet to experiment, however, I believe that if you use an odd number of arrows to start with, you will end up with one continuous interlacing circle, rather than two!
Our current series of mini drawing films is concentrating on how to draw hearts. For this how-to we are learning how to draw a shamrock of knotwork hearts.
You will need:
Paper
Coloured pencil or a crayon in green
Metallic marker pen
How to draw your layered hearts:
Begin by drawing a large “scribbly” heart with you green crayon or pencil.
Next add lobe shaped leaves all the way around your heart.
Finally add your desired message over the top of you wreath with a metallic marker. You could print out a font to trace or draw your lettering in pencil lightly and go over in marker when you are happy.
Our current series of mini drawing films is concentrating on how to draw hearts. For this how-to we are learning how to draw a shamrock of knotwork hearts.
You will need:
Paper
A pencil or a pen
How to draw your layered hearts:
Begin by drawing four heart with the bottom points, pointing at each other.
From the bottom of each heart, draw short lines on the same path as one of the side of the hearts pointing towards the heart counter clockwise to it, then draw a small square in the centre.
Draw parallel lines to the right hand side of each heart joining the square in the centre.
In our latest set of mini art films we are learning how to draw hearts in different ways. Our first film shows you how to draw a series of four (4) hearts that are layered and interconnected.
You will need:
Paper
A pencil or a pen
Coloured felt tips / pencils / crayons
How to draw your layered hearts:
Begin by drawing a heart, you can do this in pencil first, or go straight in with your colouring medium.
Draw a second, smaller heart, down and to the right of the first.
Next draw a line with a fine liner or black felt tip, the shape you are drawing is the left side of a heart. It should start in the middle of the large heart and end below it.
Repeat step three but drawing the right side of a heart. You should start above the small heart and the lines should join at the bottom.
To complete your drawing, from the left-hand “half a heart” begin drawing the other side and as you come down loop the line in a figure of eight (8) back up and over itself to form the right hand side of the “half a heart” on the right.
In our latest mini video we are learning to draw another star. This week we are doing something a little more complicated, a three dimensional (3D) knotwork star.
Each week we will present a new shape, idea or technique, with the intention of building our skills and having fun at the same time.
You will need:
Paper
A pencil or a pen
How to draw a simple knotwork star:
Begin by drawing a series of five (5) lines or “spokes”, radiating out from each other, with a very small pentagon in the centre.
Pick one of your five (5) spokes to start with, then draw a line parallel to the next spoke clockwise from the top, then another line from the middle. Close these two (2) new lines off and draw another line down towards the the next spoke round again. This can be seen in picture two (2)
Repeat step two (2) until you have completed your star!
To follow on from our first drawing with a difference session we recorded a short video of continuous line drawing, but with a difference!
Instead of using traditional drawing tools, we played with PVA and wool.
What you will need:
Slightly watered down PVA glue
Pasting brush for glue
Colourful yarn, wool or string
Colourful cards
Scissors
A glue stick
How to make your continuous line drawing:
Create a background for you picture using coloured card and your glue stick. We made a very simple landscape.
Paste PVA over the entire area you intend to draw on.
Cut lengths of wool and draw your shapes, subject or objects by laying the wool into the glue.
Your fingers may get messy, if you are struggling to not lift the wool by accident as you lay it, use the end of a pencil or paintbrush to help position the wool.
Here at Heathlands we love to explore new and exciting ways we can express ourselves with Arts & Crafts.
With this in mind we are starting a new series of live demonstrations, short videos and blog posts, for you to have a go at “drawing with a difference”. So, what do we mean by this? Quite simply we mean drawing, with anything but pencil and paper.
The inspiration for the first of our sessions is pixel art, a method for creating images with small squares or pixels.
For this activity we decided it would be really fun to use Lego Dots, as our pixels as they are movable and easy to use. We also decided to draw a polar bear, Monday was international polar bear day!
What you will need:
A Lego base plate
Lego Dots
Your imagination!
How to make your dot / pixel picture:
First you need to decide what you are going to “draw”.
select your colours and start with key features or if you prefer an outline of your idea.
Fill in your work, moving your pixels if needed.
Repeat as much as you like!
Below are some examples of pixel pictures we have made, including a few step by step images of the polar bear.
We thought for this weeks 5 minute craft we would have a bit of fun!
The origins of the bo-shuriken or ninja throwing star in Japan are still unclear, despite continuing research. This is partly because shurikenjutsu was a secret art. Thankfully the art or origami is an easy and accessible way to make your own stars!
What you will need:
4 pieces of 15x15cm origmai paper
A work surface to fold on
How to make your throwing stars:
With wrong side up, fold your paper in half diagonally and unfold.
Fold each edge of the square into the middle fold line. Repeat for all four sides creating a squashed diamond.
Fold in half along your original fold line, making a long triangle.
Fold this in half again so that both sharp points come together.
Repeat steps 1-4 for all 4 pieces of paper.
Slot each point over the next forming a square and pull the points out.
If like us you are a romantic at heart this fun and easy Valentine’s Day card is a whimsical craft that you can easily do at home!
Wax relief or resist, is a simple and versatile technique where a white crayon or oil pastel is used to draw “invisibly” on white paper, then painted over to reveal the design. It is very important that it is an oil pastel and NOT chalk.
For this craft we thought having the recipient reveal the design for themselves was a fun and unusual quirk for a card.
You will need:
An A5 piece of white card or watercolour paper, folded in half
An A6 envelope
A white wax crayon or white oil pastel
Water soluble colouring pencils
A pen to write your message inside
How to make your card:
Using your crayon or oil pastel, draw your design heavily onto the front of the card.
With your water soluble pencils, colour in randomly around your design. Be careful not to colour over the crayon or pastel. You may need to check where you drew but tilting the card to see the design.
Write a message inside, including instructions to “colour in” the front with water.
Here at Heathlands we are always looking for way to recycle, reuse and repurpose things instead of throwing them away.
Christmas can create quite a lot of waste and we decided to look for ways to reduce the load of rubbish and recycling we were putting to the curb.
One of our activities has been made possible by finding some fantastic die cutters / punches for repurposing our Christmas cards!
This craft also works with any old greeting cards just as well.
What you need:
Old greetings cards
Tag punch / cutter
Corner punch / cutter
Circular cutter
Scissors
Ruler
Pencil
Hope punch
Narrow ribbons or twine
How to make your gift tags:
For using the tag punch: using a ruler and your pencil, measure out strips of card at your desired size. Our gift tag punch cuts at 1.5, 2 and 2.5 inches. Slide the card into the punch face down and press hard.
For making rectangular tags: cut your card to the desired size and select which corner size you are punching. Punch all four corners.
For circular tag: using a circular cutter, place over desired section, hold firmly and while pressing down rotate the cutter.
For ALL tags: not use your hole punch and punch each tag for string / ribbons.
Cut a piece of ribbon or twine around 4 inches long. Double it over. Pass it through the punched whole and put the loose ends through the loop.
It’s been a while since we shared an origami fold, so here is a video of Helen T making an origami witch.
You will need:
Lightweight coloured papers
Black felt tip pen
Scissors
Glue stick
How to make your witch:
Witches hat and face:
Take your first square of paper for your hat. Fold it in half diagonally and unfold.
Fold each side inwards to form a kite shape, aligning the outer edges with the diagonal fold. Unfold again.
Next fold in the out corners to match the new diagonal folds. See the video for more clarity.
Now fold the side in again to make the kite shape once more.
Fold the sharp point down to meet its opposite corner.
Then fold the sharp point back up with a little less than a cm difference. Then fold this over again. This forms the brim of your witches hat.
Turn your work over, fold the bottom point up to meet the fold on the reverse.
Fold in either side to form the shape of your witches face.
Trace around the shape of your witches face on a scrap of paper. It should be a trapezium.
Tuck this into the folds of the witches face / hair and draw on a face.
Witches body and broom:
Take your second square of paper. Fold it in half diagonally each way, unfold, then fold in half edge to edge one way.
With the paper in half, fold down the folded edge toward the centre, creating a triangle.
Next take the folded flaps and turn the the edge in the centre up to the edge of the triangle. Do this on both sides.
Turn your work over. Fold down the the outer top edges to form a square, turn your work over again.
To form your witches feet, turn the bottom two points up and out over.
Next make your broom, cut a small square of brown paper and cut multiple slits into it to form bristles. Cut a strip of paper and using a glue stick, wrap the bristles around one end.
Assemble your witch!
Using your glue stick, stick your witches head to the body.
To complete, stick the broom to one of your witches arms.
And you’re done! Make multiple to create origami bunting or change the size of your paper to create a witch / warlock family.
Today is #worldturtleday, so we thought we would do a simple how to draw instruction for our Arts Live session over on Facebook.
The video will be linked below.
What is World Turtle Day?
World turtle day is an observance day on the 23rd of May every year to raise awareness of Turtles and the challenges that they face; climate change, plastic pollution and habitat destruction for example. To find out more visit https://www.worldturtleday.org/
What you will need to draw your turtle:
Plain paper
Pencil
Black felt tip
Rubber / eraser
Something to colour with
How to draw your turtle:
Using the template below, trace your shapes together.
We love to break a stereotype here at Heathlands, and today we thought we look at the common and much unloved pigeon.
Commonly thought of as a pest and carriers of disease, nothing could be further from the truth. The pigeon is an intelligent animal, with excellent recognition skills, as well as superb navigation abilities.
There are 5 regognised pigeon / dove species in the UK with the “feral” pigeon being a decendant of the now rare Rock Dove. You can find out more here:
World Penguin Day is celebrated on the 25th April each year, as this is roughly the date of this amazing creatures annual, northward migration. The day is a celebratory and educative initiative, that encourages people to learn more about penguins and their environment, how important they are to our ecosystems and the threats they face.
World Penguin Day is the perfect chance to learn more about these fantastic and fascinating creatures. Read up on the different species of penguin around the world and dig out some fun facts to share with your friends and family.
Did you know that there are 18 species of penguin and of these 11 are considered to be globally threatened?
For fun, we thought for World Penguin day we would make a cute finger puppet!
What you will need:
Felt in black, white and yellow
Black embroidery thread
PVA or Copydex
Needle
Scissors
Pencils
Googly eyes
How to make your penguin:
Please refer to the photos below.
On the black felt using a white pencil, draw around your index finger with a cm space all round.
Fold the felt over and cut out two shapes at the same time.
On the white felt using any pencil, draw around you index finger again up to you middle knuckle.
Cut one shape out.
Cut a small triangle for a beak out of the yellow felt.
Choose two googly eyes.
Glue white felt, beak and eyes to one of you black felt pieces.
Using black mercies cotton or embroidery thread, sew the two black pieces of felt together around the edges. Leave to bottom open.
This week we have another suncatcher craft for you! This time we’re using tissue paper and PVA.
What you need:
Black sugar paper and some things to draw around Colourful tissue paper Slightly diluted PVA Glue and pritstick Paint Brush A poly pocket to work on Scissors
How to make your suncatcher:
To make your suncatcher frame, use two round objects and draw around them.
Cut your paper frame out.
Place your ring inside your poly pocket.
Cut your tissue paper into little squares.
Paint PVA glue on the pocket over the inner edge of the frame but not the outer edge.
Place your tissue paper piece all over the glue and paints another layer of glue on top.
Allow to dry.
Peal the tissue paper off the pocket and glue it to your frame with pritstick.
We are devastated by the awful events unfolding in the Ukraine. At Heathlands we have always strived to support others who need help, whether this is fundraising for Children in Need, staffing the local Poppy Appeal table or raising awareness through our activities here and online.
To show our solidarity with the Ukraine, this week we are making paper sunflowers, to display in our windows both at Heathlands and at home. Below are the instructions for you to make your own.
What you will need:
x1 sheet of A4 yellow card
x1 sheet of A4 bright blue card
x1 sheet of A4 blue sugar paper
Scissors
Glue stick
Pinking shears (optional)
2-3cm large circular whole punch (optional)
Pencil
Something circular to draw around, about 10cm in diameter
How to make your Sunflower:
On your yellow card, draw around your circular object and cut disc out.
Draw an elongated petal shape, cut out and use this as a stencil. Draw around in 16 times and cut out.
Fold all of your petals in half.
Using your blue card and paper cut out approximately 8 small discs in each colour. These will be your sunflower seeds.
Cut a long wiggling stem for your sunflower from the blue card.
Cut a heart shaped leaf or two from your blue card or paper. You can use pinking shears to do this to give a realistic leafy look. This is optional.
Glue your petals around the edge of the large yellow disc like the rays of the sun.
Alternating between blue card and paper, glue the “seeds” in the middle in a spiral pattern, working from the outside, in.
Glue your leaves to the stem and glue your stem to the back of the flower head.
Its beginning to look a Christmas here at Heathlands!
We adore this time of year, and we are always trying to think of ways to make Christmas traditions more inclusive for the individuals we work with.
Loud noises are often not appreciated by people with autism and learning disabilities, so we came up with this idea for a crackerless Christmas cracker.
You will need:
Wrapping paper
Toilet roll cardboard inners
Ribbon or paper raffia
A4 white paper
A4 colourful paper of your choice
A4 white card
Scissors
Sellotape
A ruler
A pencil
A black felt tip pen
A writing pen
How to make your crackerless cracker:
Cut a piece of wrapping paper off the roll enough to wrap around your toilet roll tubes.
This piece should be enough to make 2 crackers if you half it from top to bottom. Our piece was 35 x 19cm.
Cut a 3cm strip off the long side of your colourful paper.
Write BANG!!! at one end on both sides.
Concertina the strip, leaving an inch at the blank end for sticking down.
Stick the strip inside of the tube using the end you didn’t concertina.
Place your tube on one long edge of your wrapping paper, in the middle and sellotape.
The end of the tube that has the BANG!!! concertina to it is your “winning end”.
Tape the winning end of your tube to the wrapping paper.
Tape the concertina end of your BANG!!! to the wrapping paper close to the other end of the tube.
Roll the wrapping paper around the tube and tape shut. Tape the soft end of your paper closed as well.
Cut two 4-5cm strips of card from the short end of your A4 white card.
Curl a piece of card and insert it into the loosing end of your cracker and tape secure.
Pinch the wrapping paper space between your tube and the piece of card and tie shut with a ribbon / raffia bow.
Add a gift / sweets / a hand written joke into your winners end of the cracker.
Bonfire Night is a beloved event here in the UK but Fireworks are not for everyone. Here at Heathlands we have a number of individuals who do not enjoy the loud bangs and whistles that come with Bonfire Night.
With this in mind we thought we would share a fun craft activity to make a Catherine Wheel full of sparkle and no noise.
You will need:
Shiny card – we used gold
A ruler
Scissors
Drawing pin
Paper stick or paper straw
Loose tinsel (the kind you throw on your tree)
Sellotape
How to make your pinwheel
Measure your card along the short side.
Using your ruler, mark the same length on each long side. Join the marks up and cut to make your card into a square.
Again, using your ruler, mark the centre of your square by lining up the opposite corners.
From each corner draw a line towards the centre 10cm long.
Cut along each of these lines.
In the centre and on every other point on your card make a small hole with your pin.
Bend each point with a hole into the middle, using your pin to join them all up, and put the pin through the middle and into your straw.
Gather 8 pieces of tinsel and tape together in the middle. Fold this bundle in half and tape to one of the points of your pinwheel. Repeat this for all four points.
We are getting in a spooky mood here at Heathlands with the run up to Halloween. Today we’ve mean making tealight jars, inspired by Helen W’s tissue paper lantern jars that can be found here!
You will need:
A glass jar
PVA Glue watered down. Around 50:50 is perfect.
A paintbrush
Tissue paper. White and black for a ghost and orange and black for a pumpkin.
Scissors
A pencil
Some scrap paper or newsprint to work on.
How to make your Halloween jar:
Decide what style of jar you are making and pick appropriately coloured tissue paper.
Water down your PVA and mix well.
Cut your tissue paper into 2-3cm squares.
Paint a little of your jar at a time and make one even layer of tissue paper all over. Making sure there are no gaps.
Use a hairdryer if you want to speed up the drying process, or leave overnight to set.
Fold a small piece of black tissue paper in half and from the folded edge draw a mouth. Also draw an eye shape. Cut these out, the mouth should be one piece and symmetrical, you should have two eyes that match.
Glue these on and paint another layer of glue all over. Leave to dry.
Put a tealight in your jar and place it in your window!
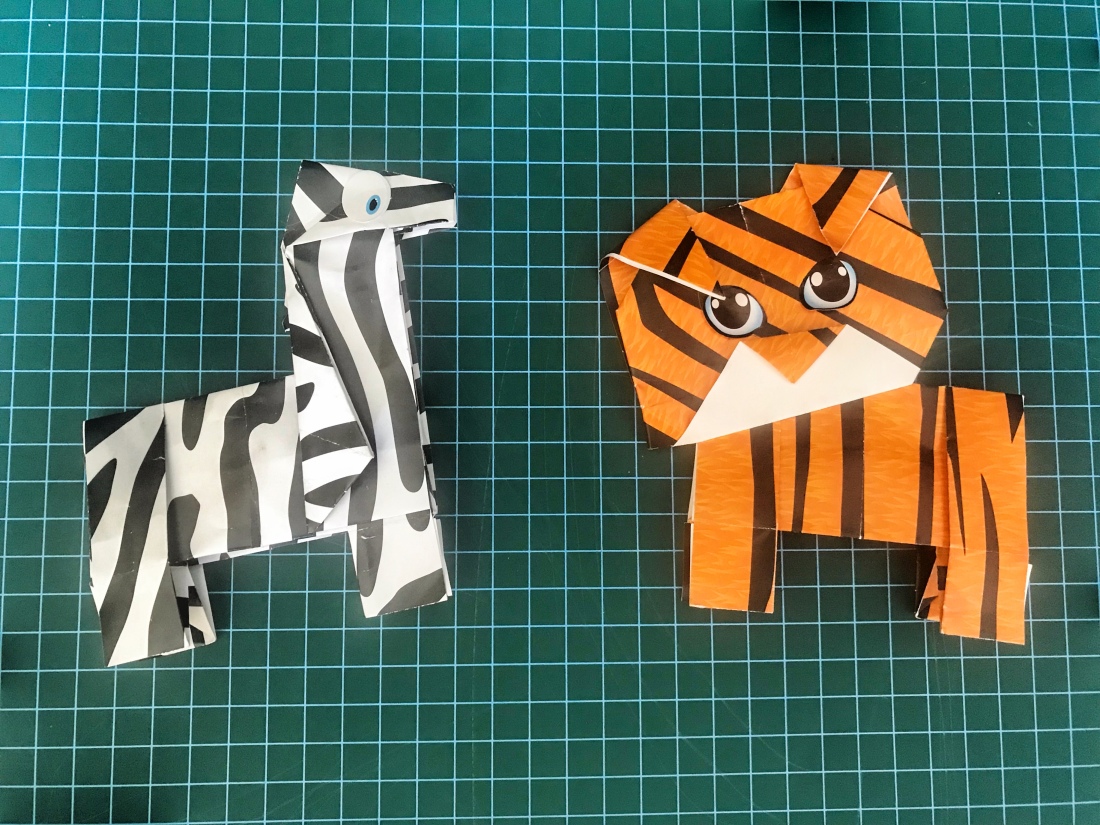
Here is another origami instruction from Monday Arts Live, this time a zebra and tiger!
You will need:
2 squares of paper and a surface to work on Pritt Stick Paint, palette & brushes if you are decorating your paper with paint, or you can use pencils, felt tips or ink.
How to make your lion:
For your zebra decorate two of your squares of paper with black wiggly stripes and the same on orange paper for your tiger.
Follow the instructions below for how to fold, or follow the link to our Facebook Art Live video for how to decorate your own paper.
This week at Heathlands we have been making stamping blocks! These are really simple to create and are a great way of getting creative and decorative with your crafts.
We’ve made our stamps to be interchangeable, meaning that the number of stamps you can create are only limited by the scale of your imagination.
To make your stamps you will need:
Eva foam / funky foam
Sticky back velcro / hook and loop tape
A block of wood
Staple gun
Scissors
Pencil / pen
To use your stamp you will need:
Flat paint tray
Poster paints / acrylics
Paper / material to stamp on
How to make your:
Stick the hook side of your velcro onto your wooden block.
Staple to secure at each end.
Draw your desired shapes for your stamps onto the eva foam making sure not to make them any larger than the block of wood.
Cut out your shapes and add the loop (soft) velcro tape onto the back. Remember that your stamp shapes will reverse or “mirror” when you are stamping. So draw letters and numbers the wrong way round.
You are ready to print! Pick your favourite paint colours and add an even layer to your stamp and get printing. You may need to gently rock your stamp to get it even.
Remember not over load your stamp or it will slide.
Have fun!
Other idea’s for simple stamps include: leaves, flowers, simple shapes, birthday balloons, snowflakes and Christmas tree’s.
We’ve been working on our origami again here at Heathlands. This week we’ve decorated paper and folded a giraffe. You can follow our instructions below and watch our live video as well.
You will need:
2 squares of paper and a surface to work on Pritstick Paint, palette, brushes and a sponge if you are decorating your paper
How to make your giraffe:
Decorate your squares of paper with a yellow fur texture, allow this to dry, then use a rough sponge and brown paint to create splodges for your giraffe.
Follow the instructions below for how to fold, or follow the link to our Facebook Art Live video.
Here at Heathlands we will soon be opening our brand new and renovated portacabin! It was designated “blue bubble”, however we wanted to make the space as warm and cheery as possible. So, the space will be decorated with both blue and yellow. Thus Minnion Bubble was born.
With that in mind, I thought for this weeks craft we would make something for our new space. A memo board inspired by minions! We’re using lightweight denim and yellow ribbons for our theme, but you can use any colours or patterns you like.
What you will need:
A wooden board or piece of MDF
Fabric
Ribbon
Quilt wading
Decorative upholstery tacks
Picture hanging fixings
Staple gun
Scissors
Screwdriver or cordless drill with phillips head bit
How to make your memo board:
Make sure your board has no sharp edges and sand off anything you think might snag your fabric.
Place your board on top of your wadding, leaving a gap around the edge so that you can wrap the wadding around to the top.
Cut the wadding to size.
Cut your fabric to the same size or every so slightly larger.
Wrap the wading and fabric around the board, and starting from the centres of the sides, working out, staple them down. Periodically check that the fabric is stretching evenly.
Starting from one corner, staple your ribbon from the back, and wrap it diagonally around the front of the board. Cut the ribbon after each wrap. Work along the board, making sure to leave even gaps.
Repeat step six in the opposite direction to create a diamond pattern with your ribbons.
Use your decorative upholstery tacks to pin down the ribbons at each point where they cross.
Attach hanging fixtures to the back, put up on your wall and enjoy!
As part of our #30dayswild activities from The Wildlife Trusts, we decided to follow one of their instructions that you can find here.
Making a your dreamcatcher is simple and fun. It’s also a great opportunity to get outdoors and explore nature. Go for a walk and collect natural materials to make your dreamcatcher with.
What you will need:
Three sturdy sticks Garden twine Natural materials to decorate – hag stones (stones with holes in), feathers, shells, leaves, flowers, grasses etc Scissors
How to make your nature dream catcher:
Arrange your sticks in a triangle and tie together with twine. Leave one with a long tail to hang.
Create a pattern of your choice in the triangle with twine. It can be a simple or as complicated as you like.
Once you’re happy with your twine, start decorating! You could also suspend some of your materials from pieces of twine from the bottom.
Think about adding flowers for colour and herbs for fragrance.
Hang your dreamcatcher and change out the fresh materials when they wilt.
Bees are really important to our whole eco-system so we thought we’d show our love of them by making a fluffy pom-pom version.
You will need:
Cardboard
Yellow and black yarn
Small amount of white net fabric (or similar)
Black pipe cleaner
Wiggly eyes
Scissors
Circular templates
Glue (PVA or a hot glue gun work best)
Step 1.
Use your circular templates (we’re using a roll of tape and a small pot) to draw two ‘donuts’ onto your cardboard. They should be the same size as each other. Cut them out.
Step 2.
Hold your two ‘donuts’ together and we’re going to start wrapping yarn around, as shown in the pictures. We’re going to wrap the ‘donut’ in black and yellow sections so we get a nice stripy bee! Try and wrap as evenly as you can, working around the circle.
Step 3.
When you’ve wrapped so much yarn the centre is full you’re ready for the next step. Very carefully, use your scissors to cut around the edge of the pom-pom, as shown.
Step 4.
Now it becomes clear why we used two cardboard circles; cut a piece of yarn and slide it in-between the cardboard circles. Wrap it around the middle and tie it as tightly as you can.
Step 5.
You can now remove the cardboard rings and give the bee a trim if needed to tidy her up!
Step 6.
From the white fabric cut two wing shapes and glue them onto the back of the bee. Bend the pipe cleaner in half and glue onto the top of the head. You may also want to bend the ends into a curve. Finally, glue the wiggly eyes onto the front of the bee. Wait for the glue to dry and you’re done!
Have fun and don’t forget to show us how you get on!
In this post we’re going to show you how to make a beautiful rose brooch, there’s only a little bit of sewing involved and unlike a real rose it won’t wilt!
You will need:
Felt
Brooch back or safety pin
Scissors
Needle and thread
Circular template (we used a roll of sellotape)
Coloured pencil
Step 1.
Use your circular template and coloured pencil to draw a circle onto your felt and cut it out.
Step 2.
Cut the circle into a spiral, with a rounded bit in the centre, as shown in the pictures. You can use your coloured pencil to draw the spiral before you cut it.
Step 3.
Starting with the outer edge of the spiral, wrap it tightly around itself in a spiral top form a rose. The rounded bit will cover the base of your spiral (see pictures.)
Step 4.
Using your needle and thread make several stitches through the spiral to hold it all in place.
Step 5.
Sew your brooch back or safety pin onto the base of your rose and it’s ready to wear.
Have fun and don’t forget to show us how you get on.
Have you seen any butterflies flying around yet? In this post we’ll show you how to make your own fluttery butterfly decoration that you can enjoy all year round.
You will need:
Coloured card
Thread, yarn or thin ribbon
Small hoop or wire
Needle
Scissors
Optional: pens, collage materials
Step 1.
Fold your coloured card in half and then using our templates (or make your own) cut out several different butterflies from the coloured card (keep the card folded as you cut so that when you open it up you have a full butterfly!)
Step 2.
At this point you could decorate your butterflies if you want to; you could draw on designs, stick bits of coloured paper or add gems and so on. Alternatively you can leave them plain!
Step 3.
To make the top of your mobile you’ll need something circular, we’re using the inside of a broken embroidery hoop but if you don’t have anything similar you could bend some wire into a hoop shape. Ours is around 20 cm across.
Step 4.
Now we’re ready to join all the bits together. Using your needle and thread attach a length of thread to each butterfly and tie the other end to the hoop. Hang each butterfly at a different length and try and space them evenly around the hoop. Keep adding butterflies until you are happy with the results.
Step 5.
To hang the mobile cut six lengths of thread each around 30 cm long. Tie them at even spacings around the hoop and then gather the other end of the threads and tie them all in a knot together at the top so you then have a way to hang the mobile.
Over the years Helen T has made hundreds of these iconic origami cranes. Did you know that Japanese folklore says that a person who makes 1000 cranes may have a wish granted by the gods! Better get cracking then…
We’re back with another tissue paper flower idea for you! In this post we’ll show you how to make simple paper roses, they look really good bunched together or you could use some fancy paper to make a single rose for someone special!
You will need:
Tissue paper (or other lightweight paper)
Pipe cleaners
Step 1.
Start with rectangles of tissue paper, ours were about 20 x 15 cm
Step 2.
Work with one sheet of paper at a time and fold over the long side, leaving a gap around 2-3 cm at the bottom. You can also gently scrunch the paper up a little for a bit more texture if you like.
Step 3.
Hold the folded edge in your fingertips and roll the paper around in a loose spiral.
Step 4.
Pinch the other end together and twist it to secure the flower.
Step 5.
Wrap one end of a pipe cleaner around the bit you just twisted, leave the rest untwisted for the stem of the rose.
Step 6.
Make some more and then pop them in a jar or vase or tie them up with a ribbon. Have fun and don’t forget to show us how you get on!
Helen T has been making these lilies since she was a child. They are a little fiddlier than the other fold we’ve done but with patience and practice they’re a wonderful origami make.
This is a really fun (if slightly messy) activity and is great for creating patterned paper for use in other crafts.
You will need:
Washing up liquid
Bowls or dishes (one for each colour)
Food colouring (or you can use paint; poster paint is great for this but you could try watered down acrylic or watercolours too)
Paper
A straw
Step 1.
Fill your tray or dish about 2-3 cm deep with water. Add the food colouring (or paint) and a good squirt of washing up liquid. The more colouring you add the stronger the colour of the bubble prints; you do need to use quite a bit. Give it all a good swish around!
Step 2.
Use the straw to create lots of bubbles by holding it under the water and blowing.
Step 3.
Carefully and gently lay the paper on top of the bubbles and lift off again. You should have some beautiful bubble prints!
Step 4.
You can over print with another colour to make an even more interesting surface.
Have fun and don’t forget to show us how you get on!
If you have any old bead necklaces that you don’t wear anymore then you could upcycle the beads into a pretty wire hanging.
You will need:
Beads (ours were from old necklaces)
Wire (we used garden wire)
Pliers and wire cutters
Ribbon
Step 1.
Start by cutting a length of wire; ours was around 60 cm long but you could make it longer (for a bigger heart) or shorter (for a smaller heart.) We stripped the plastic coating off our wire but you don’t have to do this (or you might be using wire without a plastic coating anyway!)
Step 2.
Thread a bead onto your wire and make a loop around it, this will stop the other beads sliding off as you are working.
Step 3.
Thread on more beads! Stop when you have about 5-10 cm free wire at each end.
Step 4.
Twist the two ends of wire together, pushing the beads together so there are no gaps.
Step 5.
Bend the wire into a heart shape, or a different shape if you prefer!
Step 6.
We threaded a few beads onto the two loose ends of wire for extra decoration but you could just twist the ends together and trim. Whatever you do it’s worth using your pliers to tuck the loose ends of wire in so they don’t catch on anything.
Step 7.
Tie a ribbon onto the wire between two beads so you can hang up your heart.
Have fun and don’t forget to show us how you get on.
Did you know you can recycle your old newspapers and magazines to make beautiful decorative bowls? This can get a bit messy so it’s worth covering your work area and wearing an apron!
You will need:
Newspapers and magazines (you can also use packaging paper for this)
A bowl to use as a mould (something you can easily wash) and a bowl to contain your papier mache mixture
PVA glue or wallpaper paste
Petroleum jelly or washing up liquid
Varnish (optional)
Step 1.
Start by preparing your newspaper pieces. You’ll need lots of pieces torn into squares around 4 x 4 cm. You can also tear some longer, thinner strips from the magazines, try and choose nice colourful pieces. These will be used to make the inside and outside of your bowl so choose colours you like!
Step 2.
Next mix up your glue or wallpaper paste solution. If you’re using PVA glue dilute it to 1 part glue to 2 parts water. If you’re using wallpaper paste follow the instructions on the packet.*
*Lots of wallpaper pastes contain fungicide so it’s a good idea to wear gloves.
Step 3.
Now we need to prepare the bowl (mould) and then we’re ready to get making! You can build your bowl on the inside or outside of your mould; whichever side you use cover it with either petroleum jelly or washing up liquid so that your paper mache bowl will be easier to remove when it’s dry.
Step 4.
If you’re working on the inside of your mould then your first layer will be the outside of your bowl so use the nice brightly coloured magazine strips you tore up for your first layer. Dip them into the glue solution and lay them inside the bowl , side by side and slightly overlapping until the bowl is covered.
If you’re working on the outside of the bowl then the first layer will be the inside of your bowl so again choose the coloured magazine strips; dip each strip in the glue solution and lay side by side, slightly overlapping until the bowl is covered.
Step 5.
Now we start to build up the body of bowl. We will work in layers using the newspaper squares. Dip each square in glue and then lay it in the bowl, working methodically around the bowl until it is covered. You’ll need to lay down at least 5 layers to make sure your bowl is nice and strong. I like to work alternate layers of newspaper and packing paper so I can see where I’ve been!
Step 6.
For your final layer use the colourful magazine strips again.
Step 7.
Leave your bowl to dry out thoroughly, this may take several days. Try and leave it in a warm dry place to speed the process up.
Step 8.
When the bowl is totally dry carefully ease it off the mould. You can now trim the edges with scissors to make it even or leave it rough.
You can give your bowl a coat of varnish if you’d like it to be a bit tougher but you don’t have to.
Stand back and admire your hard work! Have fun and don’t forget to show us how you get on.
Collagraphs are basically print plates made by creating a collage. In this post we’ll show you how to make a simple collagraph from bits and pieces of paper and how to take rubbings from your collagraph.
You will Need:
Cardboard
Scraps of different textured papers (e.g. wallpaper samples, tissue paper and so on)
Scraps of fabric or lace (if you have them)
Paper to make your rubbings on, we’ve got some plain paper and some coloured paper
Glue (we’re just using a glue stick for this example)
Scissors
Crayons
Graphite stick (if you have one)
Step 1.
Cut a piece of cardboard to use as your base, ours is around 10 x 15 cm.
Step 2.
Either on your base card or on a scrap piece of paper sketch out your design. Here we’ve made a simple design based on a cup.
Step 3.
Cut and tear pieces of textured paper to create a textural collage of the different sections of your design. You could also try using fabric, lace, string or anything else textured you can stick down!
Step 4.
When you’re happy with your arrangement glue it all down. Make sure you use enough glue to ensure everything is secure and all the edges are well stuck down.
Step 5.
Now we’re ready to make a rubbing! Place a piece of paper over the top of your collagraph and using the flat side of a crayon or graphite stick rub over the surface to pick up the textures. You’ll probably need to use one hand to hold the paper steady while you work so it doesn’t move or you could tape it down as you work. You should see your design coming through, showing all the different textures you’ve collaged.
Step 6.
Experiment with making rubbings on different coloured papers, papers of different thicknesses and try using different coloured crayons to highlight different sections. Each rubbing you make will be a bit different, you could make a whole set of images!
Have fun and don’t forget to show us how you get on!
It’s Penguin Day on 25th April so we thought you might enjoy a penguin themed craft! Here’s how to make a simple slot-together model of a penguin. You could make them in different sizes and colours and create a whole colony of penguins.
You will need:
Penguin template
Cardboard (we used an old box)
Pencil
Scissors
Paint (or you could use coloured pens or even collage if you prefer)
Step 1.
Print out our penguin template and use it to draw a sideways penguin and a front facing penguin on your cardboard. Don’t forget to mark where the slits will go (these are the dotted lines on the template.)
Step 2.
Carefully cut out your penguins and cut the slots; on the sideways piece this goes from the top to the centre and on the front facing piece it goes from the bottom to the centre.
Step 3.
Paint (or colour or collage) the pieces of your penguin on both sides. Most penguins have white bellies and black backs but you can use any colours you fancy!
Step 4.
When the paint is dry slot the two pieces together and you’ll have a penguin! You may need to make some small adjustments to the slots or the painted areas to make sure everything matches up.
Step 5.
Have fun and don’t forget to show us how you get on!