Did you know you can recycle your old newspapers and magazines to make beautiful decorative bowls? This can get a bit messy so it’s worth covering your work area and wearing an apron!
You will need:
Newspapers and magazines (you can also use packaging paper for this)
A bowl to use as a mould (something you can easily wash) and a bowl to contain your papier mache mixture
PVA glue or wallpaper paste
Petroleum jelly or washing up liquid
Varnish (optional)
Step 1.
Start by preparing your newspaper pieces. You’ll need lots of pieces torn into squares around 4 x 4 cm. You can also tear some longer, thinner strips from the magazines, try and choose nice colourful pieces. These will be used to make the inside and outside of your bowl so choose colours you like!
Step 2.
Next mix up your glue or wallpaper paste solution. If you’re using PVA glue dilute it to 1 part glue to 2 parts water. If you’re using wallpaper paste follow the instructions on the packet.*
*Lots of wallpaper pastes contain fungicide so it’s a good idea to wear gloves.
Step 3.
Now we need to prepare the bowl (mould) and then we’re ready to get making! You can build your bowl on the inside or outside of your mould; whichever side you use cover it with either petroleum jelly or washing up liquid so that your paper mache bowl will be easier to remove when it’s dry.
Step 4.
If you’re working on the inside of your mould then your first layer will be the outside of your bowl so use the nice brightly coloured magazine strips you tore up for your first layer. Dip them into the glue solution and lay them inside the bowl , side by side and slightly overlapping until the bowl is covered.
If you’re working on the outside of the bowl then the first layer will be the inside of your bowl so again choose the coloured magazine strips; dip each strip in the glue solution and lay side by side, slightly overlapping until the bowl is covered.
Step 5.
Now we start to build up the body of bowl. We will work in layers using the newspaper squares. Dip each square in glue and then lay it in the bowl, working methodically around the bowl until it is covered. You’ll need to lay down at least 5 layers to make sure your bowl is nice and strong. I like to work alternate layers of newspaper and packing paper so I can see where I’ve been!
Step 6.
For your final layer use the colourful magazine strips again.
Step 7.
Leave your bowl to dry out thoroughly, this may take several days. Try and leave it in a warm dry place to speed the process up.
Step 8.
When the bowl is totally dry carefully ease it off the mould. You can now trim the edges with scissors to make it even or leave it rough.
You can give your bowl a coat of varnish if you’d like it to be a bit tougher but you don’t have to.
Stand back and admire your hard work! Have fun and don’t forget to show us how you get on.
Collagraphs are basically print plates made by creating a collage. In this post we’ll show you how to make a simple collagraph from bits and pieces of paper and how to take rubbings from your collagraph.
You will Need:
Cardboard
Scraps of different textured papers (e.g. wallpaper samples, tissue paper and so on)
Scraps of fabric or lace (if you have them)
Paper to make your rubbings on, we’ve got some plain paper and some coloured paper
Glue (we’re just using a glue stick for this example)
Scissors
Crayons
Graphite stick (if you have one)
Step 1.
Cut a piece of cardboard to use as your base, ours is around 10 x 15 cm.
Step 2.
Either on your base card or on a scrap piece of paper sketch out your design. Here we’ve made a simple design based on a cup.
Step 3.
Cut and tear pieces of textured paper to create a textural collage of the different sections of your design. You could also try using fabric, lace, string or anything else textured you can stick down!
Step 4.
When you’re happy with your arrangement glue it all down. Make sure you use enough glue to ensure everything is secure and all the edges are well stuck down.
Step 5.
Now we’re ready to make a rubbing! Place a piece of paper over the top of your collagraph and using the flat side of a crayon or graphite stick rub over the surface to pick up the textures. You’ll probably need to use one hand to hold the paper steady while you work so it doesn’t move or you could tape it down as you work. You should see your design coming through, showing all the different textures you’ve collaged.
Step 6.
Experiment with making rubbings on different coloured papers, papers of different thicknesses and try using different coloured crayons to highlight different sections. Each rubbing you make will be a bit different, you could make a whole set of images!
Have fun and don’t forget to show us how you get on!
It’s Penguin Day on 25th April so we thought you might enjoy a penguin themed craft! Here’s how to make a simple slot-together model of a penguin. You could make them in different sizes and colours and create a whole colony of penguins.
You will need:
Penguin template
Cardboard (we used an old box)
Pencil
Scissors
Paint (or you could use coloured pens or even collage if you prefer)
Step 1.
Print out our penguin template and use it to draw a sideways penguin and a front facing penguin on your cardboard. Don’t forget to mark where the slits will go (these are the dotted lines on the template.)
Step 2.
Carefully cut out your penguins and cut the slots; on the sideways piece this goes from the top to the centre and on the front facing piece it goes from the bottom to the centre.
Step 3.
Paint (or colour or collage) the pieces of your penguin on both sides. Most penguins have white bellies and black backs but you can use any colours you fancy!
Step 4.
When the paint is dry slot the two pieces together and you’ll have a penguin! You may need to make some small adjustments to the slots or the painted areas to make sure everything matches up.
Step 5.
Have fun and don’t forget to show us how you get on!
These are a firm favourite in our house, and there is always a plate at a family buffet or picnic. Making devilled eggs is also a fantastic way to use up your pace eggs!
Ingredients:
6 Hard boiled eggs
3 tbsp mayonnaise
1 tsp curry powder OR 1 tsp English mustard
1 tsp apple cider vinegar
To garnish:
Pinch of sweet paprika
Method:
Make your hard boiled eggs. To do this put the eggs on to boil and when they start boiling set a timer for 7 minutes.
Put immediately into cold water to cool.
Peel your eggs and cut them in half.
Remove the yolks and place in a mixing bowl with all of your other ingredients except your garnish.
Mix together well until smooth.
Spoon or pipe your mixture back into the half eggs.
Do you have a collection of odd socks? Here’s a fun way to upcycle those lonely socks into cute little bunnies.
You will need:
A sock
Ribbon or yarn
Needle and thread
Buttons
Stuffing (we used toy stuffing but you could use small fabric scraps, cotton wool or even rice)
Scissors
Step 1.
Start by stuffing your sock, leave the top 5-6 cm or so unstuffed.
Step 2.
Make a cut down the centre of the unstuffed section and round the ends off to look more ear-like. Tie the two ends together to stop the stuffing escaping and create ears.
Step 3.
Tie a ribbon around the stuffed section to make a head and body.
Step 4.
Now we can give our bunny a face! Sew buttons on for the eyes and nose. You could also sew one onto the back of the body for a tail or make a little pom-pom and sew that on!
Step 5.
You’re done! Admire your hard work and if you have a collection of odd socks you could make a whole family of rabbits!
Have fun and don’t forget to show us how you get on.
These feathers are very simple to make but look really beautiful. We’ve used plain paper but there’s no reason you couldn’t use patterned paper or decorate the feathers before you start cutting.
You will need:
Paper, we used off cuts from other projects
Pencil
Scissors
Pointy object like a knitting needle
Template
Step 1.
Cut out a feather template (or draw your own) and draw around it on the back of your paper. When you come to do the middle of the feather press REALLY hard with your pencil so it leaves an indentation on your paper!
Step 2.
Use the knitting needle or similar pointed object to go over the middle of the feather, you’re aiming to make an indentation in the paper that will show on the right side.
Step 3.
Cut out the feather. Carefully fold along the indented line (the central part of the feather) to give it a bit of shape.
Step 4.
Now for the fiddly bit! Carefully cut all along each side of the feather being sure not to cut through the central part of the feather. Use the template with the dotted lines as a guide. Take your time doing this, you want the cuts to be quite close together but be careful not to cut off the strands.
Step 5.
Have fun and don’t forget to show us how you get on!
Cheese twist or straws are a simple and delightful snack and really easy to make! You can adapt this recipe in many ways… add finely chopped sundried tomatoes, chilli flakes, herbs or even some mustard.
Ingredients:
Plain flour to dust your surface
Premade puff pastry
2tbsp Marmite softened for spreading
75-100gGruyere or Cheddar cheese
1 egg beaten for glazing
Method:
Line 2 baking sheets with baking parchment and preheat your oven to 180°C.
Soften your marmite on a gentle heat on the stove or in short bursts in the microwave.
Dust your surface with flour and unroll pastry if pre-rolled or roll out a 30-40cm square.
Paint your pastry with the marmite about halfway up and sprinkle with about 3/4’s of your cheese.
Fold over the bare pastry and pat down.
Reroll to a little less than half a centimeter.
Egg wash and sprinkle over remaining cheese.
Cut into strips 1.5-2cm wide.
Gently twist your strips, place on baking sheets and chill for 10 minutes.
Bake for 15-20 minutes until nice and golden brown and cool.
Easter is nearly upon us so we thought we’d share a simple but fun pop up card craft with you.
You Will Need:
Card (to make the card!)
Yellow paper or card
Small piece of pink card
Scissors
Glue stick
Pencil
Pink felt tip pen
Ruler
Wiggly eyes (optional)
Step 1.
Start of by folding your card in half to make a card!
Step 2.
Using our template (or make your own) cut out a head, body and two wings from the yellow paper.
Step 3.
On the back of the head piece draw out a diamond, as shown in the photograph. Cut the solid line and fold along the dotted lines. It’s easier to do this if you fold the head in half! You should now be able to open out the ‘beak’ along the folded lines.
Step 4.
Cut out a small piece of pink paper, a little bit bigger than the diamond you drew but smaller than the head!
Step 5.
Now we’re ready to start putting everything together. First, fold the body in half longways and then glue the body in the middle of the card, matching up the folds. Next, fold the pink paper in half and stick above the body, once again lining up the folds. On top of the pink paper glue the head, making sure that the pink paper shows when the ‘beak’ opens. Finally stick on the wings and eyes and draw on some pink legs.
Step 6.
When you open and close the card the chick’s beak should also open and close! Decorate the front of the card and you’re done. Send it to someone special or pop it on your window sill as a decoration.
Have fun and don’t forget to show us how you get on.
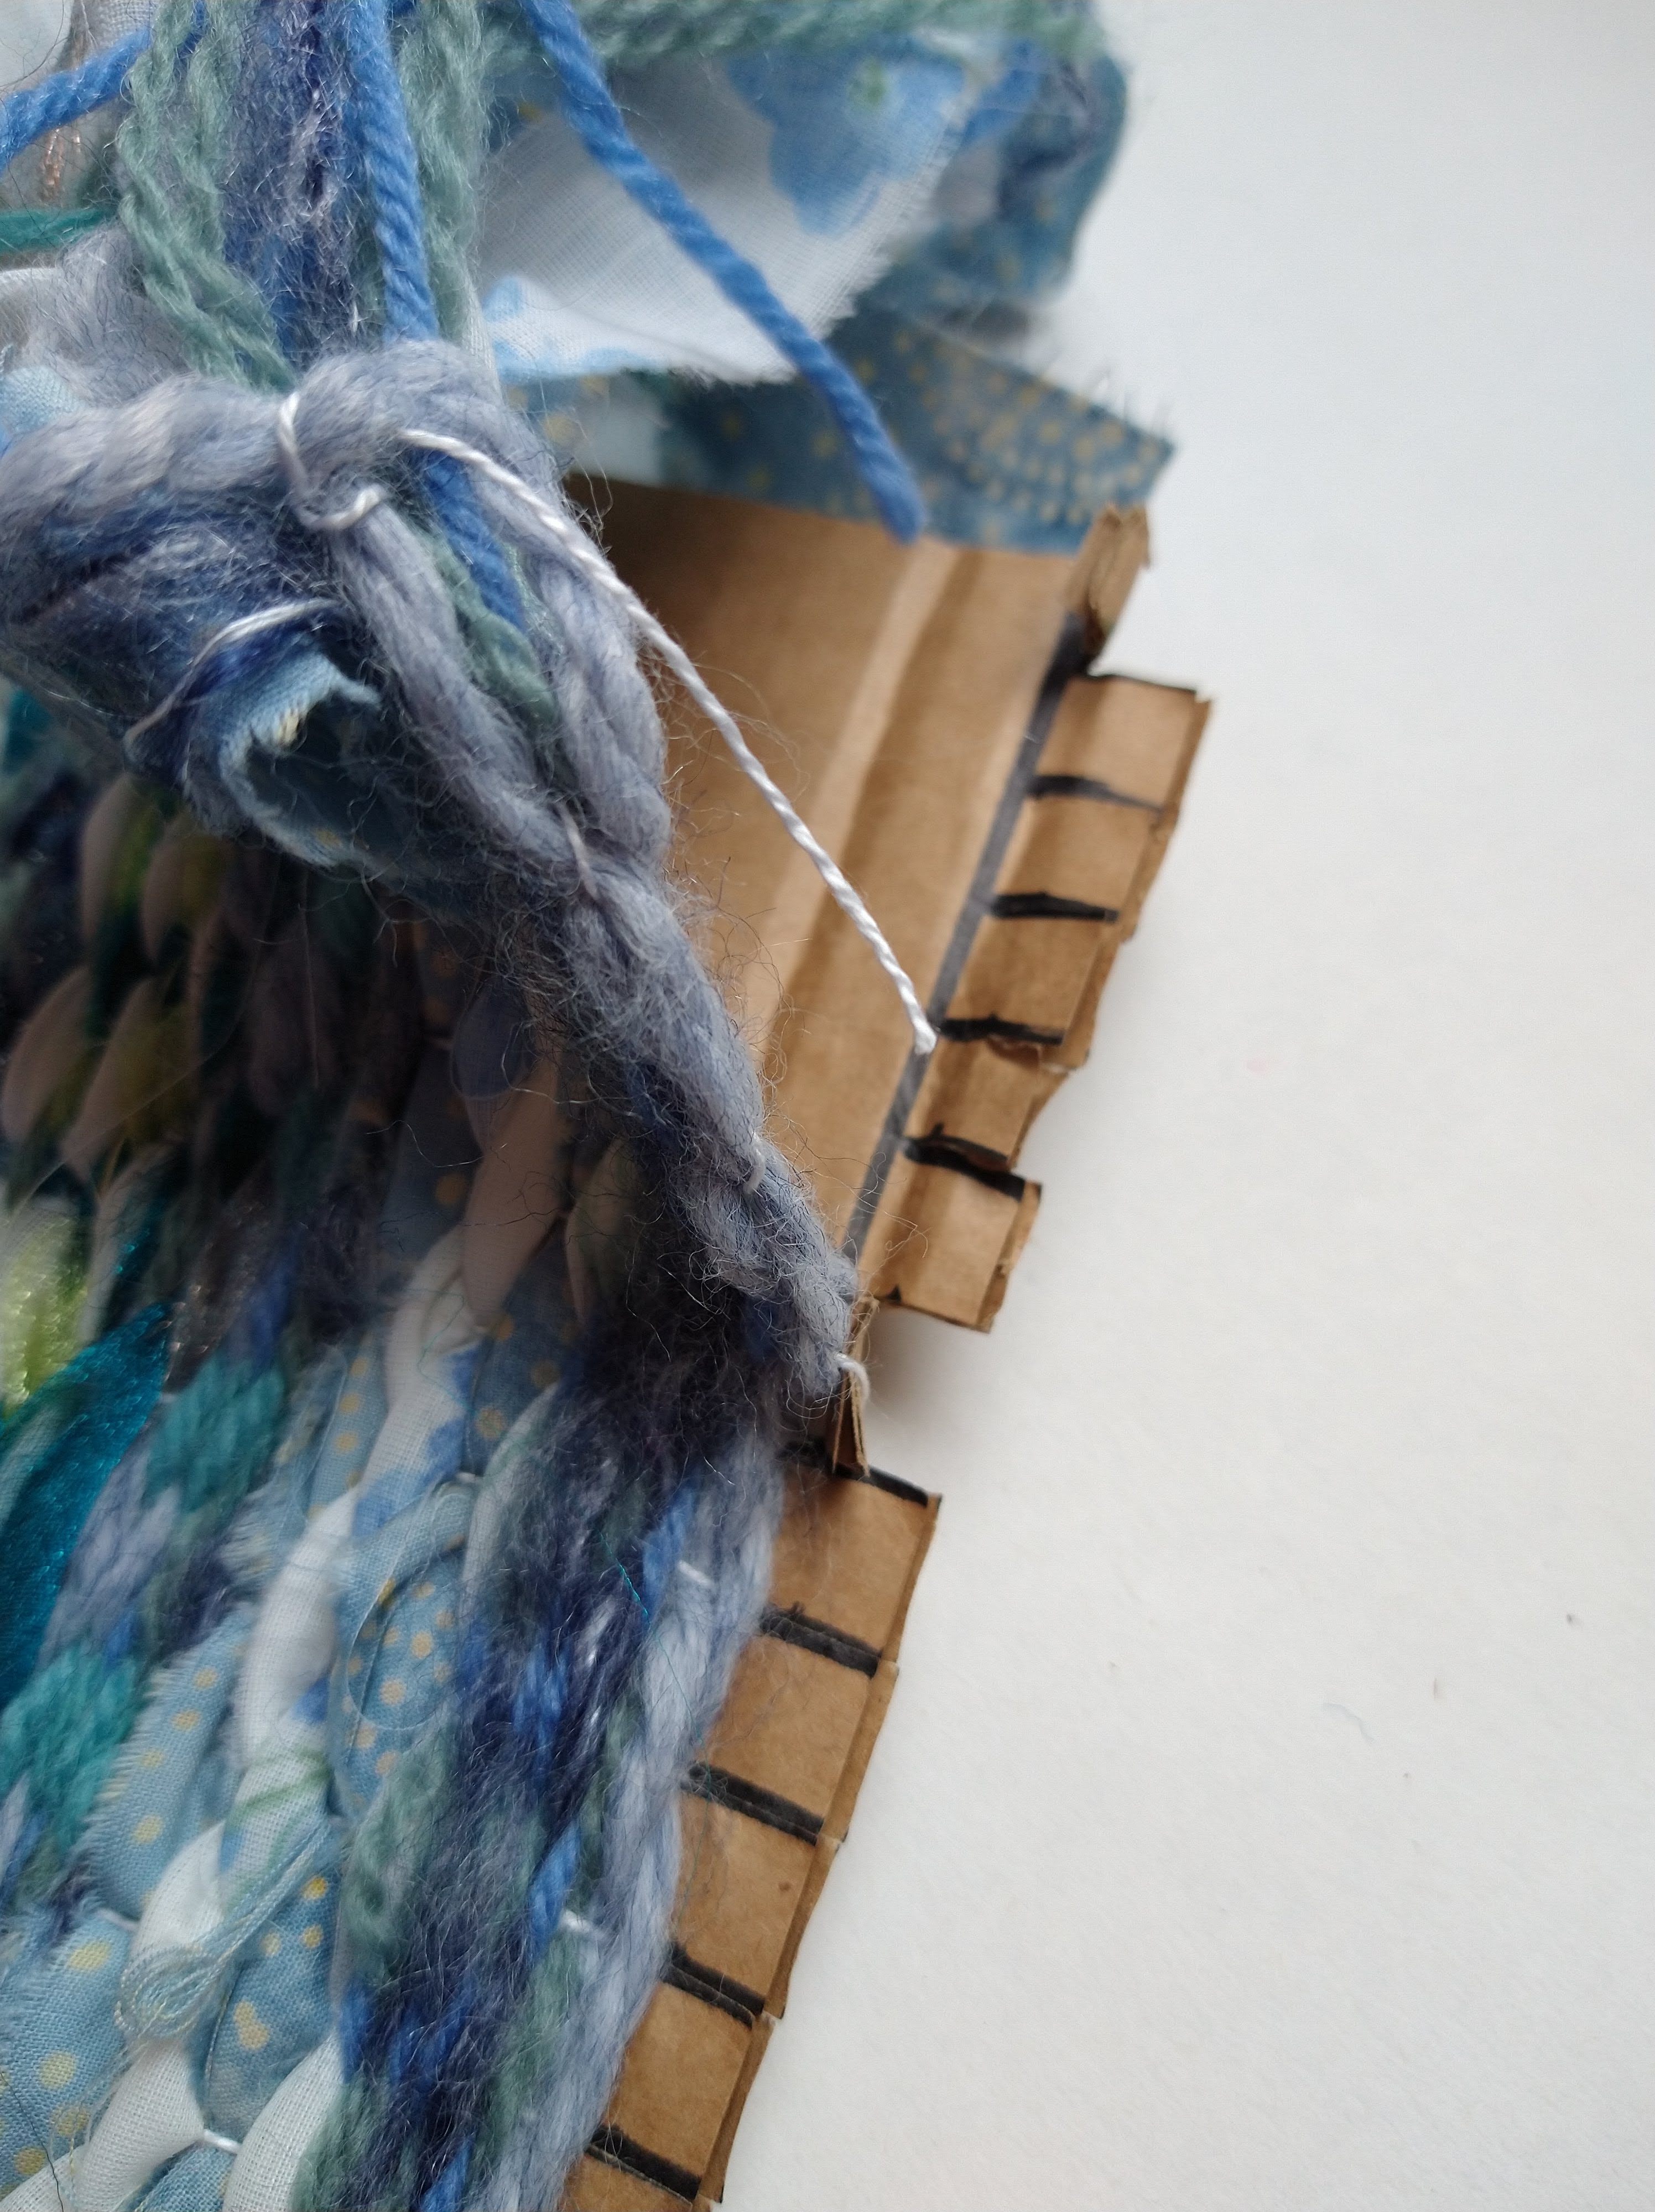
Weaving is an ancient craft and can be used to create amazing functional and decorative work. However, at its most basic it’s also really easy to get started so in this post we’ll show you how to make a simple loom from cardboard and get you weaving! We’re going to work with fairly short lengths of yarn for this project to give us a fringed edge.
You will need:
Cardboard (we’re using a 15 x 15 cm square)
Scraps of yarn, ribbon and fabric (you can use up all sorts of odds and ends for this!)
String or strong, non stretchy thread
Bodkin or large, blunt needle (optional)
Scissors
Ruler
Pen or pencil
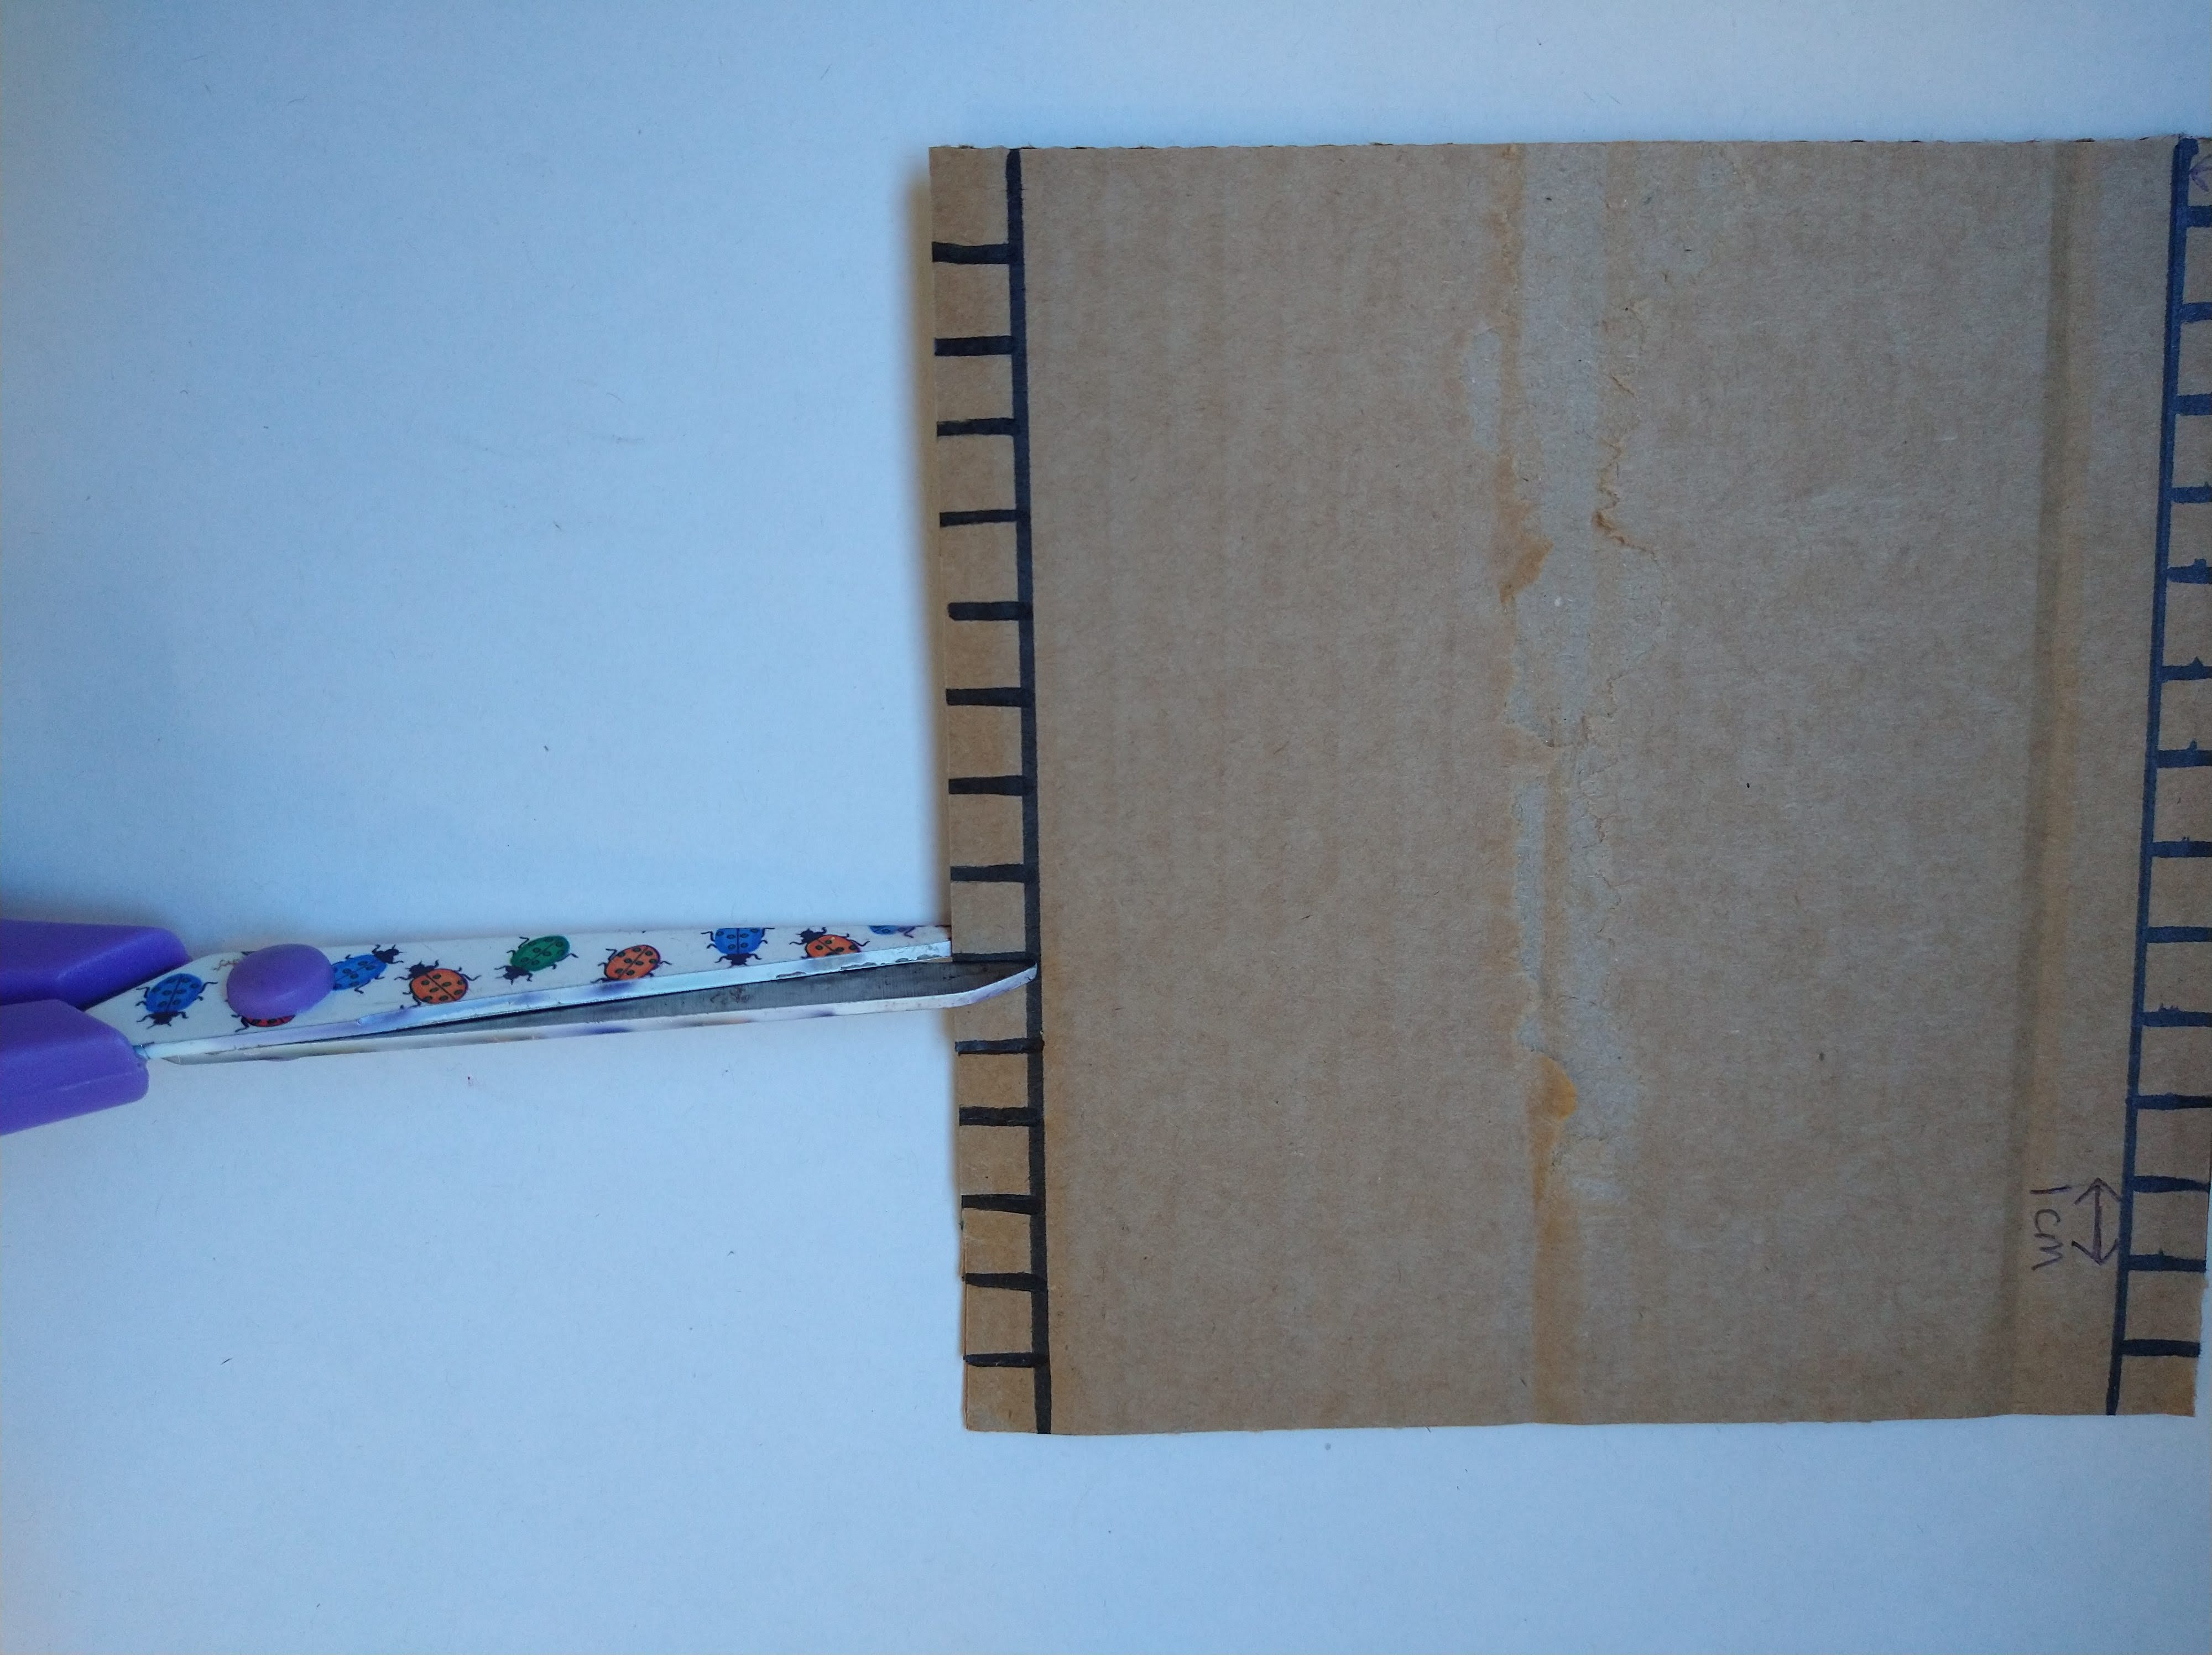
Step 1.
To start with we’re going to make our loom; mark a 1 cm line along two opposite edges of your square and mark along this line at 1 cm intervals. Now cut along the edges to the line you marked at the 1 cm intervals.
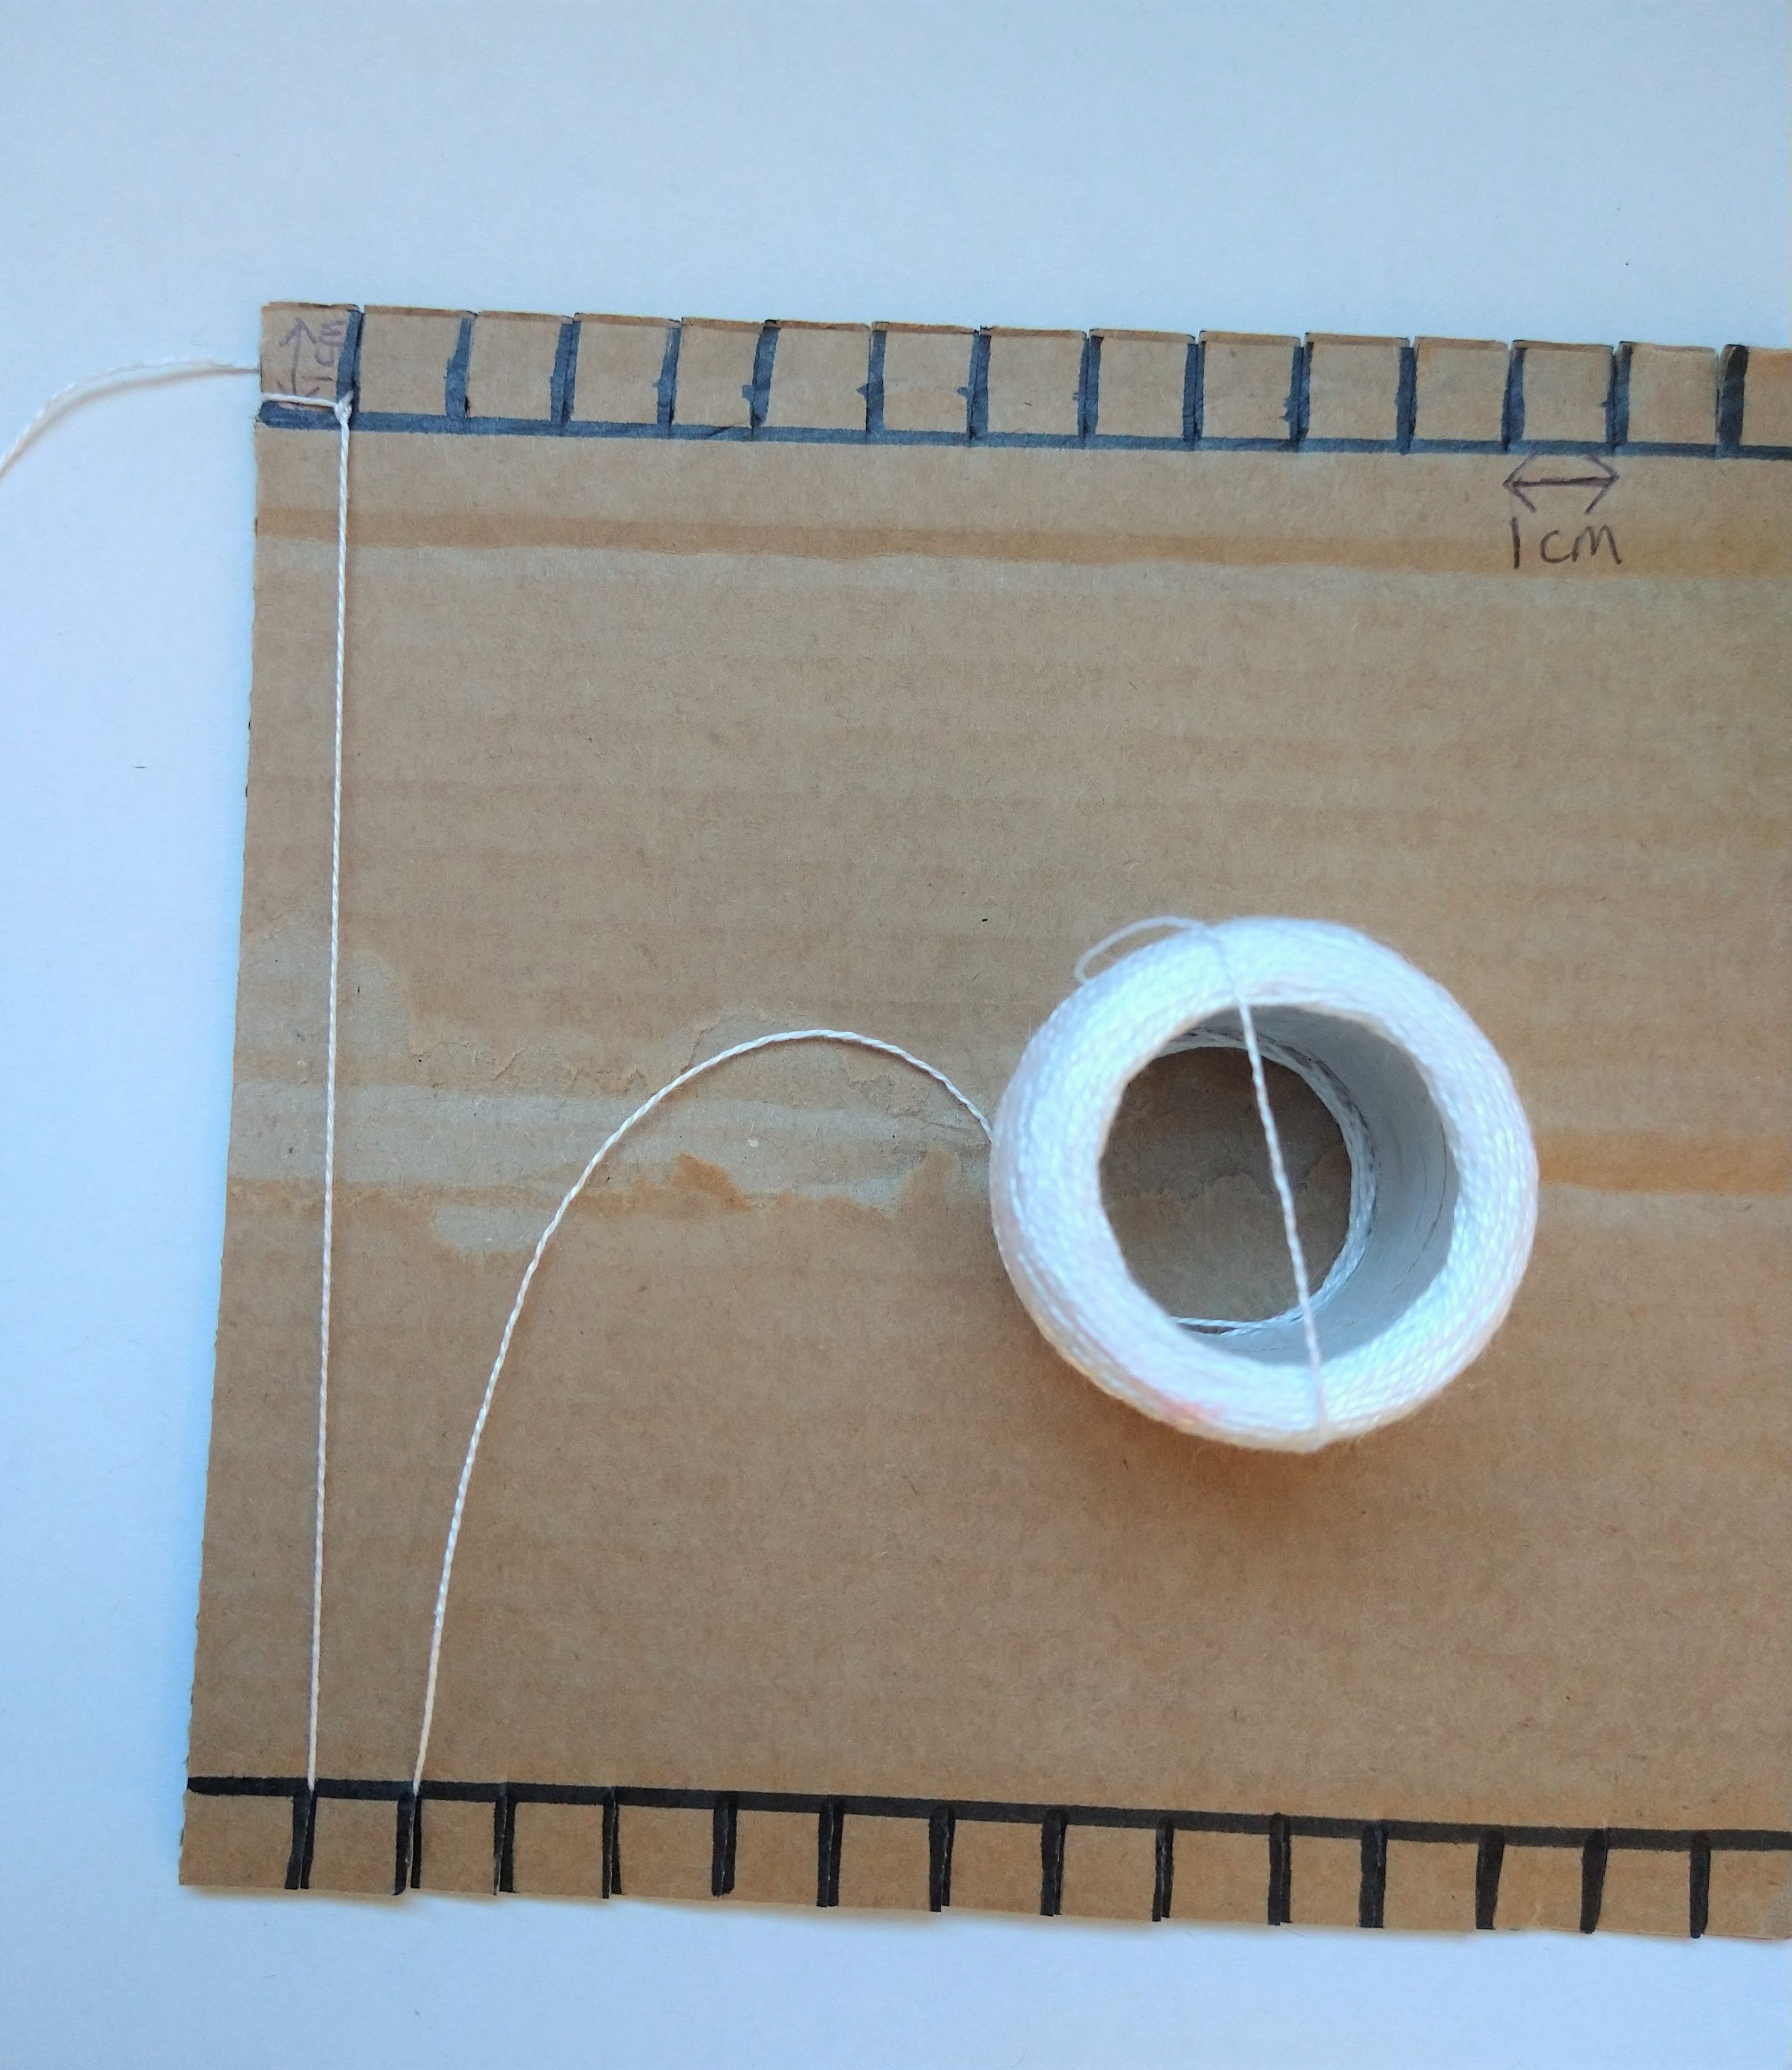
Step 2.
The next step is to warp the loom. We’re going to use the string for this bit, the thread you choose for the warp needs to be strong and not stretchy. Start at one edge by tying the string around the first ‘post’ of the top of the loom.
Step 3.
Now we’re going to take the string down to the opposite edge, around the back of the ‘post’ below and back up, around the next ‘post’ and back down. Keep going like this all the way along. When you get to the last ‘post’ tie the string off. You need the string to be quite taut but not so tight that it bends the cardboard.
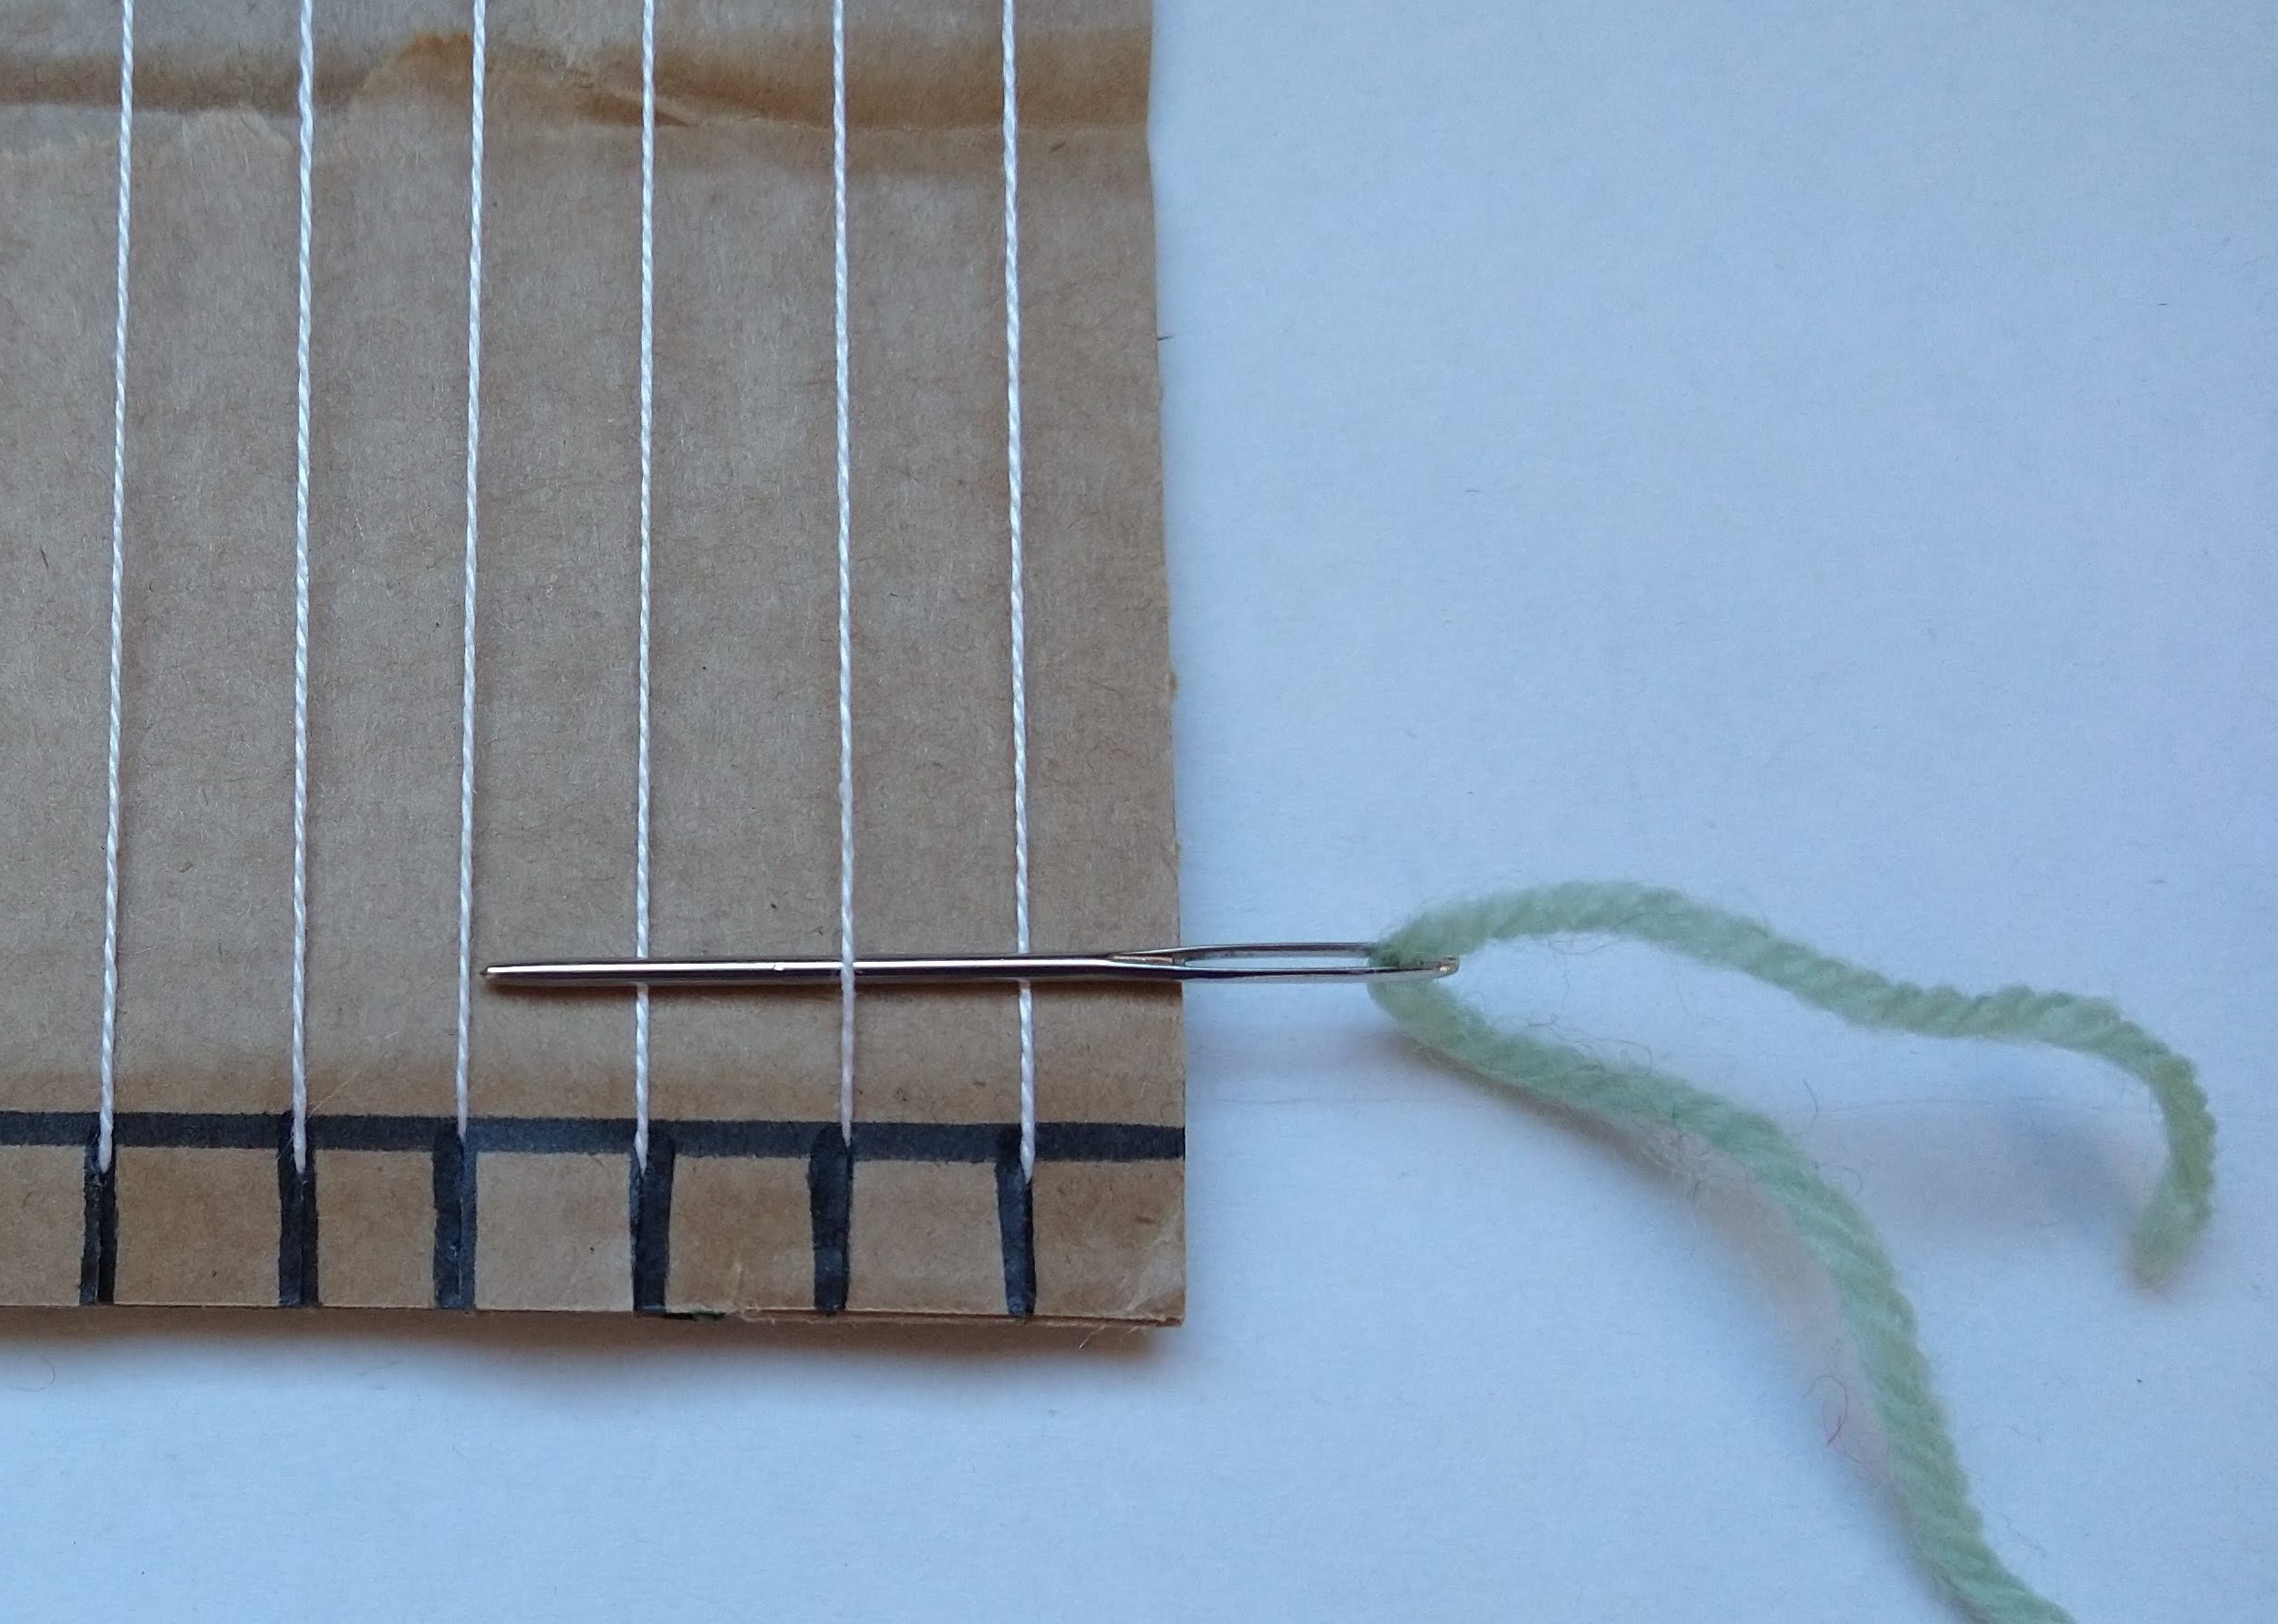
Step 4.
We’ve made our loom so now we can start weaving. Cut a piece of yarn about 5 cm wider than your loom (so in our case this was 20cm.)
Line 1: Thread the bodkin/needle with the yarn and starting at one side of the loom work over one of the loom threads, under the next one, over the next one, under the next one and so on until you reach the other side. Leave an even amount of yarn loose on either side of the loom.
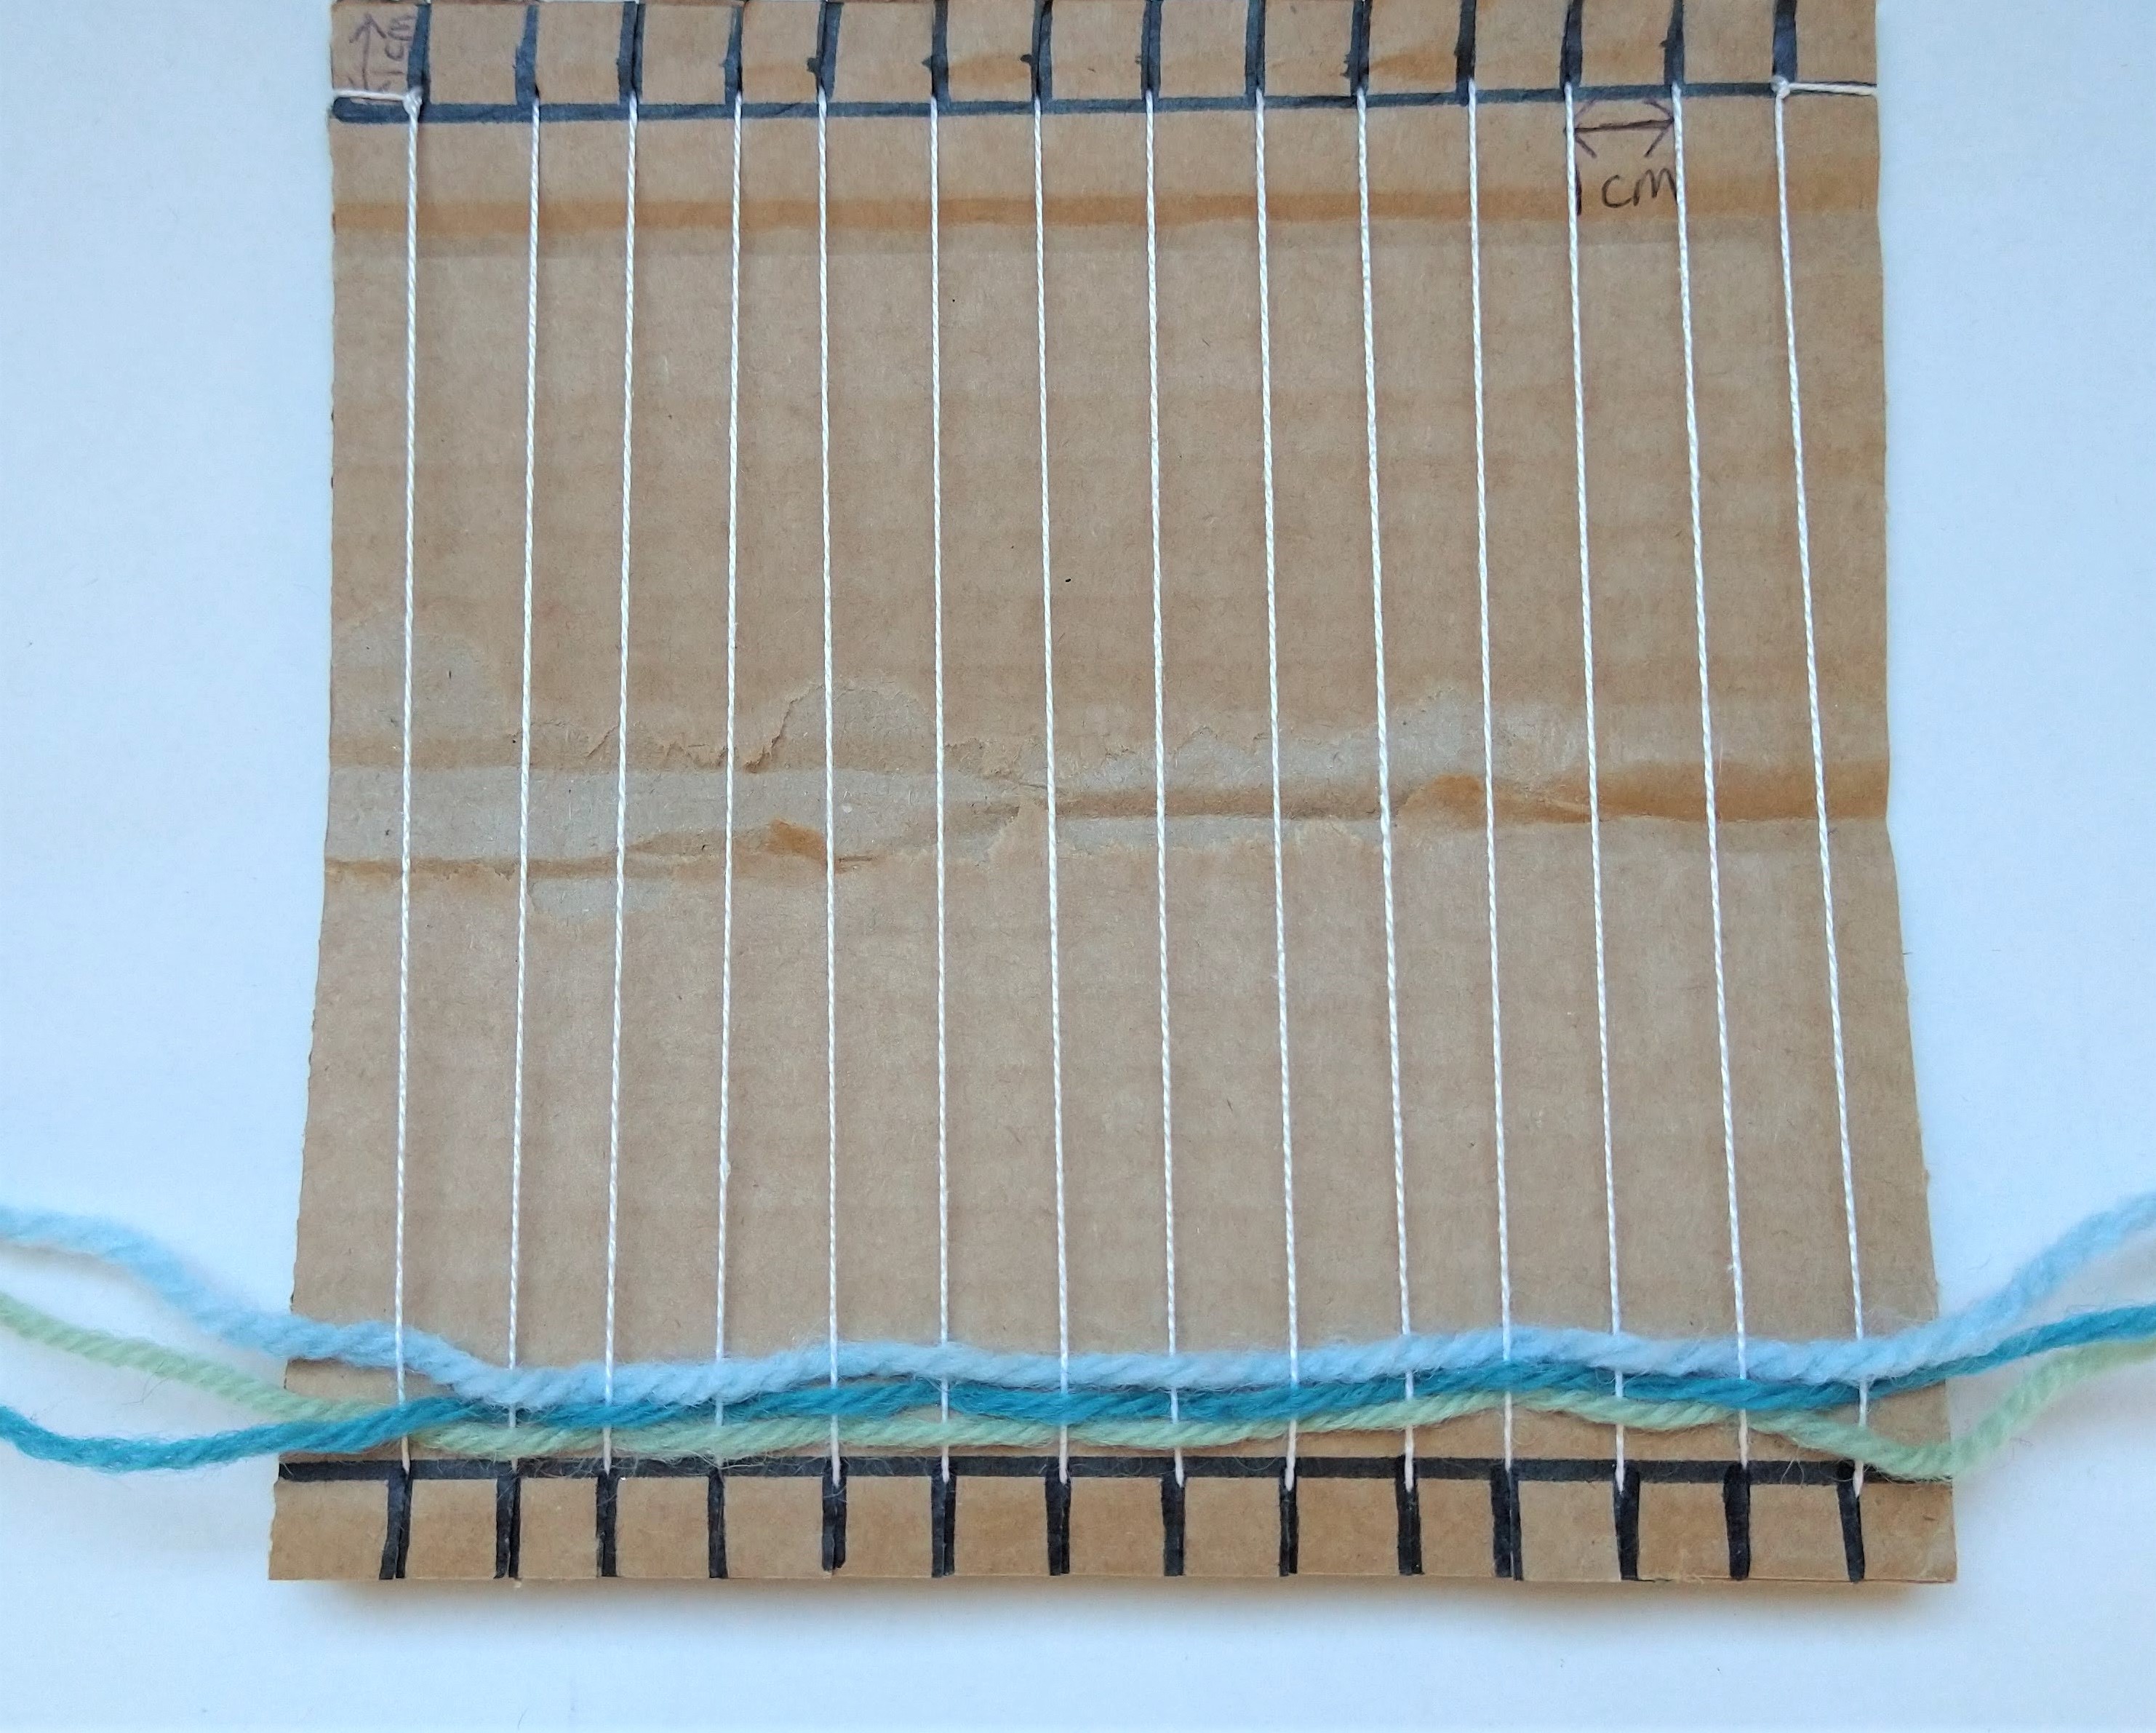
Step 5.
Line 2: Take another length of yarn (20 cm for us again) and this time weave under then over each thread, so that you’re doing the opposite to the line before (i.e. you go over the unders and under the overs.)
Step 6.
For the next row work the same as line 1 then the following row the same as line 2. Keep repeating these lines until your loom is full. Every few rows push the threads to the bottom of the loom so you get a nice tight weave.
Step 7.
As well as using yarn you can use strips of fabric, ribbon and pretty much anything linear! Experiment with different materials and see which effects you like best.
Step 8.
When your loom is full and you can’t fit anymore strips in then you can carefully lift the loops of the warp thread over the ‘posts’ of the loom. Tie the loose ends to one of the fringed ends to secure them. You can also trim the fringes if you want a neater edge.
Step 9.
Admire your hard work! Have fun and don’t forget to show us how you get on.
These beautiful flowers are really simple to make and you don’t need much in the way of materials; just some tissue paper and a pipe cleaner.
You will need:
Tissue paper
Pipe cleaner (or wire)
Scissors
Step 1.
Cut your tissue paper into rectangles, the bigger the rectangle the larger your bloom! We used the folds of the tracing paper as a guide for cutting out and our rectangles are roughly A4 size. You need between 3-8 sheets of tissue paper for each flower, more layers gives a fuller bloom.
Step 2.
Lay your rectangles on top of each other and make a concertina (like a paper fan) by making a fold across the bottom, flipping the whole stack over and folding up again by the same amount, flipping back over and folding up and so on. The folds on ours are around 2 cm wide.
Step 3.
When you’ve made your concertina, fold it in half and wrap the pipe cleaner around the middle to hold all the layers together.
Step 4.
Trim the ends of your concertina into rounded shapes, this will make your flower look like it has petals.
Step 5.
Carefully open up the concertina into a circle and gently start lifting and separating each layer of tissue paper, one by one. This bit is fiddly so take your time!
Step 6.
Admire your beautiful bloom and make some more!
Have fun and don’t forget to show us how you get on!
Beetroot is one of my favourite vegetables. Raw on salad, pickled, roasted or made into soup, it’s always delicious. Did you know beetroot is good source of vitamin C? which it great for boosting your immune system!
Pickled in this way, you can store beetroot for up to 18 months.
Ingredients:
Beetroots
White vinegar
Water
A few Bay leaves
½ – 1tsp Yellow Mustard seeds
1tbsp peppercorns
1tsp salt
Method:
Clean and trim your beetroots.
Boil for around 45minutes until tender.
Peel the beetroots once they have cooled a little, slice and add to sterilised jars.
To make your brining solution, use 2 parts vinegar and 1 part water. Make enough to cover the beetroots you have prepared. Add your herbs and spices and bring to a boil.
Pour the solution over the beetroot in the jars and seal.
We loved creating the cute fox face origami for you but we thought we’d try something a little trickier this time. So here is how to make a full fox out a of a sheet of 15 x 15cm origami paper.
If you’ve got an old t-shirt that you’d like to give a new lease of life then you could turn it into a tasselled scarf, you don’t even need to do any sewing!
You will need:
T-shirt
Scissors
Step 1.
We’re going to use the body of the t-shirt to make this scarf so start off by cutting across the t-shirt under the arms, leaving you with a tube of fabric.
Step 2.
We’re now going to make the fringe, make a series of cuts from the cut edge of the tube to about 5 cm from the opposite edge (the t-shirt hem edge,) like in the picture. Make sure you don’t cut all the way up to the edge!
Step 3.
Gently tug on each of the fringes so that they curl in on themselves slightly.
Step 4.
You’re now ready to wear your scarf! If you used a large t-shirt to start with you might be able to wrap it twice, giving you a double fringe.
As we move into Spring it’s nice to be able to go outside and gather a few bits of greenery for our homes*. Here’s a simple upcycling project to turn a glass jar into a beautiful decorated vase to show off your finds.
*Always be careful if gathering plants from the wild; only gather things that are plentiful and take care not to damage anything and only take a very small amount of any plant.
You will need:
Glass jar
A selection of ribbons, lace or other trims
Double sided tape
Scissors
Step 1.
Put two strips of double sided tape down the length of the jar, on opposite sides. These will anchor the ribbons in place.
Step 2.
Starting at one end of the jar lay a piece of ribbon or lace on top of the double sided tape, don’t totally cover the tape as you’ll need to stick the other end of the ribbon onto this tape too. Keeping the ribbon/lace taut, stretch it around the jar so it meets up with the starting point, sticking it onto the double sided tape so it lines up.
Step 3.
Work your way down the jar wrapping ribbons and lace around to create a pleasing pattern.
Step 4.
When the jar is fully covered you can cover up the ‘seam’ (where all the ribbon ends meet) with another piece of ribbon, stuck down with another piece of double sided tape.
Step 5.
Use another piece of ribbon to tie a bow and attach this at the top of the ‘seam’ with double sided tape.
Step 6.
Pop some pretty twigs or flowers in your new vase and admire your hard work!
Have fun and don’t forget to show us how you get on!
Make the most of the sunshine and make yourself a beautiful suncatcher from a plastic lid. When the light hits the suncatcher it will light up the colours like stained glass! We used lids from food pots but any clear plastic will work for this craft.
You will need:
Clear plastic lid/circle
Permanent markers in different colours
Ribbon or thread
Needle
Scrap paper
Pencil
Step 1.
On your scrap paper draw around your lid and then in the circle draw out your design, or use ours!
Step 2.
Place your plastic over your design and using the permanent markers* colour it in on the plastic.
*Felt tip pens are no good for this craft, they’ll just wipe off.
Step 3.
Use a black permanent marker to draw in the outline, over the coloured areas to give it that stained glass look.
Step 4.
Thread your ribbon or thread through the top of your plastic to make a hanging loop.
Step 5.
Hang your suncatcher in the windows and enjoy the jewel like colours. Have fun and don’t forget to show us how you get on!
1st March is St. David’s Day, the patron saint of Wales. The national flower of Wales is the daffodil so to celebrate St. David’s Day we have a daffodil themed craft for you this week!
You will need:
Yellow card
Yellow paper
Green card
Paper fastener
Ruler
Pencil
Glue stick
Step 1.
We’re going to start by preparing the main part of the daffodil (the pinwheel.) We need to start with a square, ours is 21 x 21 cm. Draw diagonal lines from corner to corner and then measure 5 cm out from the centre along each of the four lines.
Step 2.
Cut along the diagonal lines from the outside edge to the 5 cm line.
Step 3.
Using the pencil very carefully poke a small hole in the centre and at alternate ‘points’ of the square. Put this piece to one side for now.
Step 4.
Now we’re going to make the centre of the daffodil. Cut a strip of yellow paper 10 cm x 5 cm and mark a 1 cm strip along one long edge.
Step 5.
On the 1 cm strip that you’ve marked cut a series of slits from the long edge to the 1 cm line about 1 cm apart. On the other long edge cut lots of slits close together and about 2 cm long.
Step 6.
Put a line of glue along one of the short edges of the yellow paper strip and roll it into a tube and stick in place. Tuck the short tabs that you cut to the inside and cut and then glue a circle of yellow paper over the tabs. Use the pencil again to carefully poke a hole in the bottom of the circle. Put this part of the daffodil to one side.
Step 7.
Next we’re going to make the stem for our daffodil. Cut a piece of green card 10 cm wide and as long as you’d like the stem (ours is around 30 cm.) Divide the strip into four columns; three columns 3 cm wide and 1 column 1 cm wide. Fold along the lines you’ve marked.
Step 8.
Carefully poke a hole in the middle of one of the 3 cm columns about 3 cm from the top.
Step 9.
Now we’re ready to put everything together! Put the paper fastener through the hole in the base of the yellow paper section first and then through the holes in the corners of the pinwheel, working your way round in order. The paper fastener then goes through the hole in the centre of the pinwheel and lastly the hole in the green card. Fold down the edges of the paper fastener, making sure you leave enough slack for it to spin.
Step 10.
Finally, put glue along the 1 cm wide column of the green card and glue it to the edge of the furthest 3 cm column to make a prism.
Step 11.
You’re done! Take it outside to test it in the breeze (unless it’s raining!) Have fun and don’t forget to show us how you get on!
Did you know that 27th February is International Polar Bear Day? To celebrate these beautiful and endangered creatures we’ve got a simple stand up model for you to make. We’ve left ours plain but you could decorate it with cotton wool, paper or fabric to add more texture.
You will need:
Polar Bear Model Template
White card (or use recycled card and paint or collage it white)
Pencil
Black pen
Scissors
Glue stick
Step 1.
Use the template to cut out 2 body piece, 2 ears and 3 pieces of card for the supports.
Step 2.
Glue an ear onto each polar bear. It’s a good idea at this point to make sure your polar bears are ‘facing’ each other so you end up with a left and a right side rather than two lefts or two rights!
Step 3.
Use the black pen to draw an eye and nose onto each polar bear.
Step 4.
Now we’re ready to join the two sides together. Using the marks on the template as a guide fold over each end of each support piece. Again using the template as a guide glue the three supports onto the body of the bears.
Step 5.
Your bear should now stand up! Have fun and don’t forget to show us how you get on!
Breakfast or brown sauce is a delicious accompaniment to a full English breakfast or a simple sausage sarnie, and while there are a couple of unusual ingredients, it’s really easy to make!
This recipe requires a food processor, smoothie maker or stick blender.
Ingredients:
1tbsp oil
200g chopped onion
200g dates or prunes halved
600g cooking apples, cored and chopped, there’s no need to peel them!
500ml balsamic vinegar
200g muscovado or dark soft brown sugar
3tbsp tamarind paste
40g root ginger peel and chopped
4 cloves
1tsp grated nutmeg
2tbsp Worcestershire sauce
Add a couple of chillies or a good dash of tabasco to add a kick to your sauce.
Method:
Heat the oil and gently cook the onions with a pinch of salt for 10 minutes.
Add all the other ingredients, mix well and simmer for 30 minutes.
Blend together. Be careful transferring the mixture, it will be very hot!
Put into sterilised jars and leave for a week or two to mature. This can be stored for up to 6 months.
Here’s a fun little craft to brighten someone’s day!
You will need:
Small box
Pipe cleaner
Scrap of card or Funky Foam
Glue
Pen or Pencil
Scissors
Step 1.
We’re going to begin by making our spring. To do this wrap the pipe cleaner around the pen or pencil to make a coiled spring. Leave a bit of pipe cleaner uncurled at each end, we’ll use these bits to put the design on and to fix it into the box.
Step 2.
Now we’re going to make our bird. Cut two little bird shapes and two little wings from your card or foam. Make sure your design is small enough to fit in your box! I used a pen to draw little eyes on my bird.
Step 3.
Glue the birds on either side of one end of the pipe cleaner spring.
Step 4.
Glue the wings on to the bird.
Step 5.
Bend the free end of the pipe cleaner at a right angle to the spring and glue it into the bottom of the box.
Step 6.
When the glue is dry, carefully press down the spring and put the lid on the box. When you open the box again the spring should pop up!
Have fun and don’t forget to show us how you get on!
To celebrate Chinese New Year we have a special lantern garland for you to make. Lanterns symbolise the hope for a brighter future, red is considered a happy colour in China and gold is a symbol of wealth.
You will need:
Gold paper or card
Red and yellow paper
Glue or double sided tape
Ribbon or yarn (about 1 metre or as long as you want your garland to be)
Bits of fancy trim or ribbon (optional)
Ruler
Pencil
Scissors
Craft knife (optional)
Step 1.
We’re going to start by cutting out the gold, red and yellow paper. For each lantern you will need a piece of gold paper and a piece of red or yellow paper.
For the smaller lantern:
Cut a piece of gold paper 5 x 10 cm and a piece of coloured paper 6 x 10 cm
For the larger lantern:
Cut a piece of gold paper 8 x 15 cm and a piece of coloured paper 9 x 15 cm
Step 2.
The next step is to cut the slits in the coloured paper. We measured our lines out first with our ruler and pencil. To make the rounded lantern it’s easiest to use a craft knife and a cutting mat to cut the slits but for the other lantern you can fold the paper in half and use the scissors to make the cuts. Whichever method you use make sure you don’t cut right to the edge!
Step 3.
Now we can construct our lanterns. Start by rolling the gold paper into a tube and glue it or stick it in place.
Step 4.
Now we’re going to add the coloured paper. Glue along the top and bottom edge of the coloured paper and then carefully wrap it around the gold tube, matching up the edges.
Step 5.
For each lantern cut a strip of paper around 0.5 x 10 cm and use it to make a handle. Glue it in place.
Step 6.
If you’ve got some fancy trims or ribbons then you can glue them around the top and bottom of each lantern for a bit of extra decoration.
Step 7.
Thread each lantern onto the ribbon, tying them in place to keep them nicely spaced out.
This is a fantastic and easy lunch time snack! Quesadillas are a mexican street food and you can adapt them to your own taste. You could make them spicy, serve with salsa, guacamole or sour cream, or just enjoy them as they are. Substitute cheese for lactose free and these snack can be vegan as well!
Ingredients:
This is to make 1 quesadilla. x2 Soft tortilla wraps 50g grated cheddar cheese – about a handful 1 spring onion chopped 2-3 cherry tomatoes quartered 1 baby corn sliced 1-2 mushrooms sliced 1⁄4 pepper sliced You can add any veg you like really. If you’d like to make it spicy, add chilli or chipotle paste, you could switch the cheese for feta, add some cooked sweet potato, chorizo, chicken or even left over chilli con . These are a great versatile snack to use what’s in your fridge!
Method:
Using a heavy bottomed frying pan on a medium heat, add one of your wraps. You don’t need oil!
Add half of your cheese.
Add your fillings.
Add the rest of your cheese on top.
Add the second wrap and gently press down.
Allow the tortilla to toast to a deep golden brown then flip and allow the other side to toast as well.
On Monday the 25th January this year [2021] it will be Burns night here in the UK. But what is Burns night?
The first Burns Night was celebrated over 200 years ago, but its popularity has only grown over the years, with traditions passed down from generation to generation. Burns Night is considered to be Scotland’s “other national day”, alongside St Andrew’s Day in November. Celebrated on the same date each year, the night gives a nod to the life and work of the Scottish poet, Robert Burns.
Traditional festivities generally include a Burns Supper, which features readings of his poetry throughout the meal.
To celebrate we thought we would share how to make a tradition Burn’s night supper – haggis, neeps and tatties, that’s haggis, swede and potatoes!
Ingredients:
x1 shop bought haggis 3 large potatoes 1 swede Butter Milk Salt and pepper to taste
Method:
Cook your haggis according to the packets instructions.
Peel and chop your swede into rough cm cubes and boil for 40-45 minutes. Mash with butter, salt and pepper.
Peel and roughly chop your potatoes. Mash with a big splash of milk, butter, salt and pepper.
At Heathlands we are looking forward to spring. So we thought we’d share this simple paper fold / origami with you all to make a bouquet of everlasting tulips!
With Valentine’s Day fast approaching we thought we’d share a card project with you to get your heart racing!
You will need:
A Blank Card (or a piece of card you can fold in half to make a card)
Selection of lightweight papers
Sharp needle
Thread
Pencil
Scissors
Paper clip
Step 1.
We’re going to start by making our heart template. To do this fold one of your lightweight papers in half and draw a half heart shape along the fold, as shown. Cut it out and open it up, you should have a heart shape! Make sure it fits on the folded card.
Step 2.
Using the heart you just made as a template, cut out a heart from each of your lightweight papers. Our card has 4 hearts.
Step 3.
Stack your hearts one on top of the other and place the stack in the centre of the card front. You might want to use a paperclip to hold them in place as you work. Using the needle carefully pierce a series of holes in a line down the centre of the heart, being sure to go through all the layers. This bit can be quite tough so take your time. Make sure that the hearts all stay lined up as you work.
Step 4.
Using the holes you just made as a guide, make a line of running stitches down the centre of the hearts, going through all the layers.
Step 5.
Write a message in your card and send it to someone special!
Have you seen any snowdrops yet? I love spotting the first snowdrop, a beautiful reminder that spring is on it’s way! Here’s how to make your own from pipe cleaners.
You will need:
White pipe cleaners
Green Pipe cleaners
Step 1.
Make three small loop shapes from one of the white pipe cleaners, these will be your petals.
Step 2.
Pinch the petals together and use one of the green pipe cleaners to wrap around the top to hold them together.
Step 3.
Bend the rest of the green pipe cleaner to make the stem.
Step 4.
Make some more! Tie them together in a bunch or pop them in a little jar or vase and enjoy!
Happy Burns Night! Today Scot’s all over the world celebrate Burns Night in honour of poet Robert (or Rabbie) Burns. Traditionally, a meal of haggis, neeps (turnips) and tatties (potatoes) is served whilst people recite poems and sing songs by Burns. We thought we’d show you how to make a card featuring another famous Scottish emblem; the thistle!
You will need:
Blue, green and purple felt
Green embroidery thread
Plain Card and envelope*
Needle
Scissors
Glue stick
Thistle template (print out a little bit smaller than your card)
*You don’t have to make this as a card, you could just make it as a small picture
Step 1.
Begin by cutting a background from the blue felt, slightly smaller than the front of your card.
Step 2.
Use the template to cut out 2 leaves, a stem and the round part of the flower from green and the top part of the flower from purple felt.
Step 3.
Make little cuts into the purple felt to make little petals. Make sure not to cut right to the edge!
Step 4.
Lay the stem and flower head parts onto the background. Make sure the green circle overlaps the purple edge. Pop a pin in to hold things in place while you work. Use running stitch to attach the stem.
Step 5.
Make a set of diagonal stitches across the green circle, making sure you go through the purple felt underneath at the top edge. Make another set of diagonal stitches in the opposite direction.
Step 6.
Now place the leaves in place and use pins to hold them whilst you work. Use running stitch to attach them.
Step 7.
Glue your finished thistle onto the front of the card and you’re done! You can now send the card to someone special or keep it as a decoration!
Here’s a good way of helping you get a bit more organised! Stick these pegs on your fridge (or other magnetic surface) and use them to keep track of all those important bits of paper.
You will need:
Wooden Pegs
Small magnets or magnetic tape
Scraps of pretty paper
Buttons or other embellishments
PVA glue
Glue gun (optional)
Step 1.
Using your peg as a guide, cut out strips of paper the same length and width as your peg. The easiest way to do this is to place your peg on the paper and draw round it.
Step 2.
Use the PVA glue to attach the strips of paper to one side of the peg.
Step 3.
You could now add some buttons and other embellishments to make your pegs extra special. Make sure you use plenty of glue to make sure they’re really secure! Allow the glue to dry before moving onto the next step. You can also trim any overhanging edges once the glue has dried.
Step 3.
Glue a magnet or small piece of magnetic tape to the back of the peg. Again, make sure to use plenty of glue!
Step 4.
When the glue is dry you can put your memo peg on your fridge. Have fun and don’t forget to show us how you get on!
Here’s a good way to upcycle old containers to make cute panda pots with fluffy pom-pom ears! You can use them as storage pots, plant pots or whatever you like. You could also adapt the idea to make different animals.
You will need:
A pot or container to cover
Two colours of felt; one light and one dark
Wiggly eyes
Yarn
Scrap cardboard
Scissors
Coloured pencil
Ruler
PVA Glue
Step 1.
Start off by measuring and cutting a strip of the light coloured felt that is the same width as your pot and that is long enough to wrap around the pot. You may need to join two strips together if you have a larger pot.
Step 2.
Glue the strip of felt around the pot, trimming off any excess. Make sure you use plenty of glue!
Step 3.
Cut out two eye patches and a nose from the darker coloured felt, use our template as a guide and scale it up or down depending on the size of the pot you’re using. Glue them onto the front of your pot and glue the wiggly eyes in place too.
Step 4.
Next we’re going to make the ears! Following the instructions from our pom-pom ice cream tutorial make two pom-poms from your yarn. Glue them in place on either side of the pot.
Step 5.
Your pot is now ready to be used! Have fun and don’t forget to show us how you get on.
If you’re home is looking a little bare after taking down the Christmas decorations then why not make yourself a moon and stars garland to cheer things up a bit? You could even make use of any shiny packaging and ribbons left over from Christmas.
You will need:
Card: we used metallic card but you might have some nice bits and pieces saved from Christmas packaging you could use
Ribbon (a piece as long as you want your garland, ours is around 2 metres)
Templates (you can use ours or use a small bowl/roll of tape to make your own)
Pencil
Scissors
Hole punch
Step 1.
On the back of your card draw out your templates. Use the bowl/roll of tape to make a full moon and two crescent moons. You’ll also need to draw four stars. Cut them out carefully using the scissors.
Alternatively, you can use our templates! Print them out and either glue onto the back of the card and cut them out or print them out, cut them out and draw around them onto the card.
Step 2.
On the right side of the card (the shiny side) add some details to the moons and stars using a pencil. The aim is to make indentations more than anything so a blunt pencil works best. You could add faces, patterns or different textures.
Step 3.
Use the hole punch to make a hole in the top of each card piece.
Step 4.
Thread the moons and stars onto the ribbon, think about what order you would like them in.
Step 5.
Hang up your garland and admire your hard work!
Have fun and don’t forget to show us how you get on!
Now it’s well known that we love a sausage roll at Heathlands. So we thought we’d put a festive spin on them and make Christmas sausage rolls! How you might ask? Well with stuffing of course and chestnuts. Yum.
Ingredients:
1 pack of premade puff pastry
500g pack of sausage meat
1 pack of your favourite stuffing
½ a pack of precooked chestnuts – these are optional
1 egg
Flour for dusting
Method:
Preheat your oven to 190°C.
Remember; you should ALWAYS wash your hands before and after cooking. This is very important as you are handling raw meat.
Make your stuffing to the packets instructions, remembering to half the water as we are only making half the packet. Allow this to cool.
Roughly chop your chestnuts if you are using them.
Combine your sausage meat, stuffing and chestnuts.
Roll out your pastry sheet onto a dusted surface to stop it sticking. Add your sausage meat in a line, leaving enough space to fold over the pastry and egg wash next to it.
“Crimp” the edges of the pastry with a fork and cut to desired length. Slit the tops, egg wash and decorate with seeds if you want to.
Place on a non-stick baking sheet or line a baking sheet with greaseproof paper. Bake at 190°C for 20 minutes, allow to cool a little and enjoy!
This week we are trying an origami fold with a difference. You may not know, but many traditional origami folds involves cutting! In this form the practice is known as kirigami and like origami it does not use glue.
This dragonfly is finished with two small cuts to form its double wings.
Masks have been a bit of a thing this year haven’t they? Here’s a fun version that you can make to welcome in the New Year!
You will need:
Card
Template (use ours or make your own)
A stick (the ones you get for gardening are good!)
Glue
Sticky tape
Scissors
Things for decorating: pens, feathers, collage materials and so on
Step 1.
Firstly we need to cut our mask shape out of the card. You can use our template or design your own.
Step 2.
Now for the fun part! Decorate your mask; be as outrageous as you like. You could use felt tip pens, collage or whatever else you can think of. Here are some that we’ve made at Heathlands to give you some ideas.
Step 3.
When you’re happy with your mask use the sticky tape to attach a stick at the side so you can hold it up to your face.
Step 4.
Parade around in your beautiful new mask and have a very Happy New Year!
Did you enjoy our Paper Snowflakes tutorial from a couple of weeks ago? Here’s another papercraft activity that’s perfect for using up leftover Christmas wrapping paper.
You will need:
Wrapping paper (or other lightweight paper)
Scissors
Pencil
Needle and Thread
Glue
Step 1.
Cut a rectangle of wrapping paper (ours was around 40 cm x 20 cm.)
Step 2.
Fold the paper into a concertina, with each fold being around 3 cm wide.
Step 3.
Fold the concertina in half and secure with a small stitch.
Step 4.
Draw a couple of curves onto the folds, try and make it more or less symmetrical! Remember to leave most of the fold intact.
Step 5.
Cut out the curves you drew (remembering to leave most of the fold intact otherwise you’ll end up with a pile of confetti!)
Step 6.
Put glue on one of the folds at the centre of the folded concertina and stick it to the opposite fold. Open it up and repeat on the other side to complete your decoration. Add a bit of thread to hang your decoration and admire your hard work!
We love Christmas at Heathlands. It the time of year where we relax our timetable to play games, make delicious food and even sing karaoke!
This year will be a little different but everyone has still been working really hard to make Heathlands as festive as possible.
As part of our festivities we are making our own Christmas decorations. We have already shared some with you and this week we thought we’d show you how to make an origami Christmas tree that you can decorate just like a real one.
We will also add an instructional video when it is loaded on YouTube.
It’s time to start thinking about decking the halls with boughs of…brussel sprouts! Here’s a fun craft to add a bit of humour to your festive decorating this year.
You will need:
Green yarn and a little bit of black yarn (to make the pom-poms)
Ribbon, twine or thick yarn (to hang the pom-poms on)
Wiggly eyes
Cardboard or Pom pom makers
Scissors
Glue
Step 1.
Make your brussel sprouts! Using the green yarn make some pom-poms; you can use a pom-pom maker (if you have one) or follow the instructions from our Pom-Pom Ice Creams post. Leave the piece of wool you use to tie the pom-poms off quite long so you can use it to attach to the garland.
Step 2.
Glue wiggly eyes and a small piece of black yarn onto each pom-pom to give them faces.
Step 3.
Use the long piece of yarn left over from tying off the pom-pom to attach it to your ribbon. Leave a gap at each end of the ribbon to hang your garland up with.
This easy recipe is for a delicious Christmas cake and is based on a Borrowdale tea bread! Make it a couple of weeks in advance and it will mature beautifully. If you would like your cake to be gluten free, simply swap the flour for plain gluten free flour!
Ingredients:
450g mixed fruit – we used raisins, sultanas, currents, glace cherries and mixed peel
100ml strong tea
100ml rum – you can leave this out and double your tea
250g plain flour
175g dark brown sugar
25g melted butter
1 egg whisked
Zest of a large orange
1/2tsp bicarbonate of soda
1tsp mixed spice
1tsp cinnamon
Pinch of salt
*** Optional – nuts and glace cherries to decorate
Method:
Preheat your oven to 180 degrees C.
Weigh out all the ingredients.
Put fruit and tea mixture into a bowl and allow to soak for at least 3 hours, overnight is better.
Quickly melt your butter in the microwave. 30-40 seconds should be enough.
Stir sugar into the fruit mixture.
Sift flour, bicarbonate of soda, spices and salt into the mixture and combine.
Stir in beaten egg and melted butter.
Put into an 8inch round cake tin, decorate if wanted and bake for between 1hour & 15minutes and 1 hour & 30minutes. Check the cake with a temperature probe or a skewer. Skewer should come out clean, temp should be 92 degrees C.
This week for our origami I thought we would try a cute little bird! Why not make them with red paper and use them as Christmas ornaments for your tree?
This week we’re going to show you how to use air-dry clay to make some festive hanging decorations.
You will need:
Air dry clay
Ribbon
Paint (we used acrylics)
Festive shaped cookie cutters
Pencil or similar to make a hole
Things to add texture such as lace, leaves or textured wallpaper
Rolling pin
Mat or wipeable surface to work on
Step 1.
Begin by rolling your clay out in a nice even layer, about 1cm thick.
Step 2.
Lay your textured things on top and roll over them lightly with your rolling pin (if it is somethin flat) to leave an impression in the clay.
Step 3.
Use the cookie cutters to cut out different shapes, try and choose areas with good texture.
Step 4.
Use the pencil to make a hole near the top of each cut out shape (to hang it up with.)
Step 5.
Allow the clay to dry out thoroughly, this may take several days.
Step 6.
Paint your decs! We stuck to one colour highlighted with a bit of white for each decoration to highlight the textures but you can use as many colours as you’d like.
Step 7.
When the paint is dry, thread a bit of ribbon through the hole and your decorations are ready to hang up.
We think they’d make lovely presents or extra special gift tags. What do you think?
Paper snowflakes are quick and easy to make and look beautiful in a wintery window. Here’s how to make your own!
You will need:
Squares of paper (you can use any size, the bigger your square of paper the bigger your snowflake will be.)
Scissors
Step 1.
Fold your square of paper in half diagonally to make a triangle
Step 2.
Fold the triangle in half again to make a smaller triangle
Step 3.
Fold it in half again!
Step 4.
Start cutting into the folded triangle, you can cut any shapes you like but be sure to leave at least some of the folded edges intact or you will end up with a pile of confetti rather than a snowflake!
Step 5.
Open up your snowflake and marvel at its beauty!
Have fun and don’t forget to show us how you get on!
This week for our origami we are making a cute little fish! The folding at the start of these instructions are important to lay out the structure for the subsequent folds.
Hummus is a delicious dip from the Middle East, traditionally it is eaten as part of a “meze” or selection of dishes to make a whole meal. You could eat this with carrot sticks as a great snack, with bread sticks or even in a wrap with olives, tomatoes and rocket.
This recipe is also vegan, gluten and lactose free!
We’ve also included some idea’s for how you can flavour your hummus.
*** You will need a food processor, smoothie maker [nutribullet] or stick blender with tub and blade attachment to make this recipe.
Ingredients:
1 can of chickpeas
4tbsp tahini OR 3tbsp smooth peanut butter
Juice 1 lemon
1 large glove of garlic
2tbsp olive oil
1/tsp salt
65ml lukewarm water
Method:
Juice your lemon and peal the garlic.
Add of of your ingredient into the machine you are using.
Blend together until smooth. If your hummus is a little think, add 1tbsp of water and a time.
Enjoy!
You add lots of lovely flavours to hummus. We tried dill with extra lemon, sweet chilli sauce and olives.